Wednesday, October 31, 2012

1Q32 Instant Gellish

Happy Wednesday, Dixie's Cuppers!

The following post is about nail polish, but it differs from the variety of nail polish I typically blab about. Today I will be showing you a UV/LED light-cure gel polish from 1Q32 Instant Gellish. I was immediately interested in this product because it claims to be tough and long-lasting like your typical light-cured gel manicures, but with only ONE STEP. In the past I have visited nail salons and received Shellac manicures that are well known for lasting at least 2 weeks. I really enjoyed those manicures because they were low-maintenance; however they required multiple steps like base coats, primers, pH bonders and cleansers to remove the sticky layer after curing. 

Keep reading to learn more about this product and to see photos!


The process of prepping your nails for this polish is the same way I typically would prep for a normal nail polish. After that, the application of the 1Q32 Instant Gellish is very easy. Below I have listed the step-by-step instructions:

1. Push back your cuticles with a cuticle pusher. 
2. Cleanse the nail surface with a nail polish remover to remove dirt and oil. 
3. Apply a layer of 1Q32 Instant Gellish color onto your nail, and avoid staining the skin.
4. Place under a UV or LED lamp to harden and dry your 1Q32 Instant Gellish color. (My bottles said that with a UV lamp the cure time is 2-3 minutes and with an LED lamp it is 20-30 seconds.)
5. Apply 2nd layer of color and repeat step 4 to harden and dry.
6. Your nails are polished, shiny, and dry to the touch instantly. 


All of the photos except for the very last one show two coats of 1Q32's QB45 which is a lovely, bright cherry red! I used an LED lamp that I purchased at Walmart, so my nails cured perfectly in 30 seconds. The formula of this polish was a bit thicker than a typical nail polish, so there was a slight learning curve with the application. However, once I got the hang of it, it really wasn't bad at all. I would also say that the brush was a bit too wide for my nail beds, but I just cleaned the polish off my cuticles before I cured it. In the end, I was extremely pleased with how my nails looked and I was beyond ecstatic that my nails were completely dry and I could get back to my day without worrying about smudging my manicure!

When comparing this product to the Shellac manicure I spoke of earlier, I would say they are equal in quality and strength, but this product seems so much easier to use because there are fewer steps. 

Click to enjoy this polish in all its glory!

Is that not the most glossy, gorgeous red polish you've ever seen?! I still can't believe that all I used was this tiny bottle of polish and an LED lamp. There was no base coat or top coat needed. The product claims to give you weeks of maintenance-free wear. I can definitely vouch for the strength of this polish and I can see how you could get a couple weeks worth of wear from it. I only wore this polish for about 6 days, and at that time it was still holding up quite well.

The directions for removing this polish are to soak your nails in the company's Liquid-Q for 5-10 minutes and rub the color off with an orange stick or finger pads. The company is located in Japan and they could not ship that product due to strict airmail regulations, so they claimed that pure acetone would work just as well. I was a bad, bad girl and peeled the polish off one evening while watching television. :O I know, I felt guilty the whole time, but I just couldn't help it. Soaking my fingers in acetone at the time didn't seem appealing. I was very lucky that my nails were not damaged in the process. ;)

Without top coat

So what you see above and below are two very similar photos. The top one is simply two coats of the 1Q32 Instant Gellish color, while the photo below has the 1Q32.TopQ (top coat). I personally cannot tell a difference. The instructions claim that the top coat is optional, but that it can help protect your manicure and keep it shiny for a longer period of time.

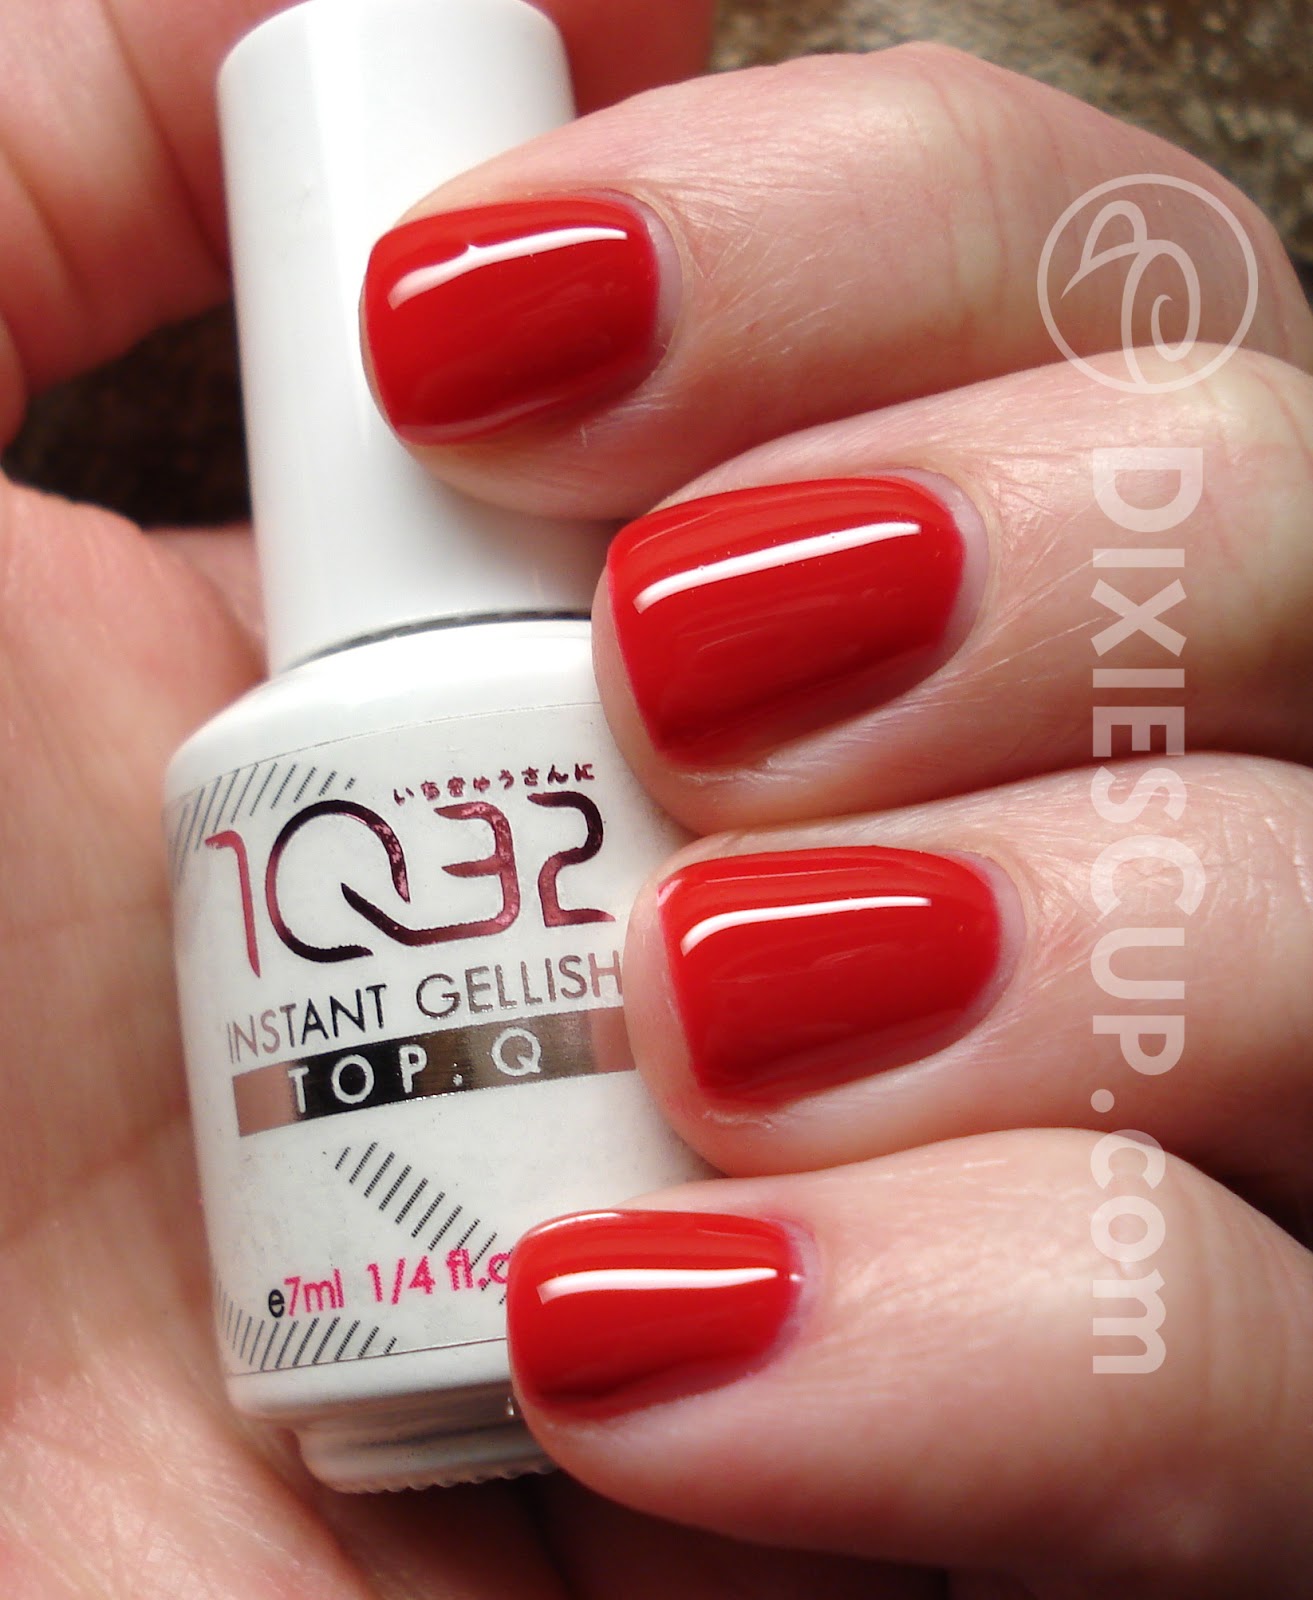
With the provided 1Q32.TopQ top coat

If you are the type of person that likes to have nicely manicured nails, but you hate that your nail polish only lasts a day or two before chipping, I would highly recommend this product. Each bottle this size is approximately $24, and that may seem a little high for its size, HOWEVER you would pay at least that much for a manicure in a salon. You can get multiple manicures out of one of these bottles!

If you are like me and you love to change your nail polish 2-3 times a week, then this product may not be for you because it is definitely meant to be a long-wearing polish. :)

If you'd like to see the HUGE selection of colors available, visit www.1Q32.com. Also, go like their Facebook Page so you can receive updates about specials they are running!

Thanks SO much for stopping by. I hope you have a great week!

--Dixie

**1Q32 Instant Gellish provided for review. Please read my disclosure policy for more information.**


Tuesday, October 23, 2012

Essie - Miss Fancy Pants

Yo.

I have been feeling a bit lazy with my nails lately, so today's manicure is plain jane. Sometimes it's nice to have one solid, neutral color that's not overwhelming. I really enjoyed this one. 

Clicky Clicky
This is Essie Miss Fancy Pants. It is a lovely brownish taupe with a hint of something kinda purple or pink? Basically when you can't decide if it is brown or gray, you call it taupe. The photos have your typical base coat, two coats of color, and top coat. Lately I've been using Revlon's Quick Dry Top Coat

The formula on this color is just lovely. My only complaint it that Essie's nail polishes have a super tiny brush. Sometimes it can be difficult to work with, but as you can see in the photos, this one cooperated quite well. I think I got about 4 days out of this one before it chipped. Not too shabby since that is usually as long as I can handle going before changing my polish again. 


I don't have much else to say. This is an eye-catching neutral polish and I got as many compliments on it as I do my brighter manicures. If you can deal with the small Essie brush, I'd highly recommend it. :)

Thanks for taking a peek at my nails!

--Dixie

Monday, October 22, 2012

SKINNY Bracelet

Helloooooo!

Today I have something to show you guys that is a little different from my usual shenanigans. I purchased a pretty bracelet from a company called SKINNY by Jessica Elliot. The website is www.skinnystyle.com

I discovered this brand through the Today Show on NBC. I was lucky enough to be watching a segment that they do occasionally that gives their viewers really great deals on popular products. The segment reminds me of the sort of deals you can get on Groupon. Please keep reading to learn more!


The bracelet you see in the photos above is their 18K gold plated equestrian bracelet with ivory Italian leather. There were a couple of other color combinations, but by the time I got to the website, most of the others were sold out. 

The original price of these bracelets are $120, but I managed to get mine for $29! I'd say that is a pretty good deal. :) If you would like to check out the other color options available, you can click HERE to be directed to these exact bracelets. They are all very pretty and it is difficult to choose just one!

Thanks for reading!

--Dixie

Sunday, October 21, 2012

Zoya - Charisma

Hey there, Buddies.

Today I am sharing a manicure featuring another Zoya from the Nail Mail I posted about last month. This is Zoya Charisma. The polish on my ring finger is Color Club Tweet Me, and on my pinky finger is Sally Hansen Insta-Dri Lightening.


Charisma is a very bright shade of neon magenta/red-toned purple cream. As you can tell in the photos, it is brighter in the bottle than on my fingers. What you see above is 3 coats of Charisma, with a base coat underneath and top coat on top. In true neon polish form, it dries to a satiny finish and it is a little tricky to apply without dragging bald spots. My recommendation would be to wait for each coat to dry almost completely before adding another coat. 

Next time I wear this, I might try a base of white first to see if it makes the color bright like what's in the bottle. 


Color Club Tweet Me and Sally Hansen Insta-Dri Lightening were also 3 coats of color. The first two coats of all three of these polishes were streaky with bald spots, but the third coat really made things opaque. The top coat smoothed everything over nicely and made Charisma shine like it should. I'm not a huge fan of polishes that require more than two coats because each additional coat just means more dry time, but when they are pretty like these, I suppose I can live with it. ;)


I also decided to add some of my mustache decals. I used these on one of the first manicures I ever blogged about. I'd like to think my skills have come a long way since then. 


Thanks for reading! Have a lovely day. :)

--Dixie

Monday, October 15, 2012

Halloween Nail Art

Hey you guys!

Here is my second attempt at Halloween nail art. I'd say it is a bit of a step up from my Frankenstein nails, huh? It sure took longer!

Left Hand
Below is a list of all the polishes that I used for this manicure. 
Thumb and ring finger: OPI Y'all Come Back Ya Hear? as the base, Pure Ice Black Rage for the accents, and silver loose glitter from the Born Pretty Store
Index: Pure Ice Black Rage for the base & China Glaze Orange You Hot? for the pumpkin.
Middle finger: Zoya Charisma for the base and Pure Ice Black Rage for the bat. 
Pinky: Pure Ice Black Rage for the base and Finger Paints Paper Mache for the ghost. 

Right Hand
I freehanded the characters on my index, middle, and pinky fingers using a variety of nail art brushes and dotting tools. I used scotch tape for the designs on my thumb and ring finger, and then placed the loose glitter (dubbed "glequins" by Sam at The Nailasaurus) along the border with a toothpick. 

Left Hand
I'm really happy with how the nail art turned out. I wasn't sure I'd be able to accomplish such a large undertaking, but I keep surprising myself. 

If you read my blog, I'd love to have your feedback on what you think about this manicure.

Also, what types of posts keep you coming back? Is it the nails, the beauty box reviews, or other product reviews? Would you like to see me write about anything else? PLEASE LET ME KNOW! Thanks!

--Dixie

Sunday, October 14, 2012

August GlossyBox

Good evening, fellow Dixie's Cuppers!

Wednesday I got my flu shot. I'm very good at getting shots. I'M NOT SCARED OF NEEDLES! For real. But I was a big baby afterward because myyyy armmmm hurtttttt. :( Wahhhh. It's cool though. The flu sucks more than my sore arm.

Okay, lets get down to business here with my August GlossyBox


Biolage - Exquisite Oil Replenishing Treatment (Full size $22)
This treatment has a Moringa Oil Blend and claims to give instant shine and weightless replenishment to all hair types. Typically I love Biolage products, especially because of the lovely smell, but I'm not sold on this one. I feel like a broken record... I think I review at LEAST one hair moisturizer per beauty box. UGH! Anyway, the reason I wasn't a huge fan of this one was because it left my hair feeling quite greasy, and I didn't really use that much. I need to try it at least once more just to make sure, but I have a difficult time doing that because I hate when my hair is greasy!

Ellis Faas - Glazed Lips ( Full size $35)

Ellis Faas - Glazed Lips ( Full size $35)

Ellis Faas - Glazed Lips ( Full size $35)
The packaging on this lip gloss looks AMAZING. And expensive! I know GlossyBox sent out a number of different colors, but somehow I got clear. I'm not necessarily disappointed about that because it is the safest color (or lack of color), but I have clear already, and there's not much you can do with clear. This is just your typical clear lip gloss. Nothing fancy. I don't think it gives me a good representation of what this company can do with lip glosses, yet I won't be trying any other shades because they are $35 a tube. Ack!

Illamasqua - Purity (Full size $14)
You all know that the way to my heart is with nail polish. I'm NEVER upset with a beauty box when they send me a nail polish sample, or in this case a full size bottle! Especially when it is a higher-end nail polish brand like Illamasqua. I've never tried this brand before, and it didn't disappoint! The formula was just great. You can see the manicure I did with this polish HERE

Ole Henriksen - Truth Serum (Full size $48)
I've noticed this brand inside Sephora before, but never had a reason to try it. Even so, I was excited to try this product. The information on the card says: "This high powered vitamin C complex helps smooth out lines and wrinkles, fights environmental aggressors and keeps your skin moisturized, nourished and protected." Sounds lovely and all, but this serum is sticky and felt sort of like I was rubbing honey on my face. Once it dried, my skin felt tight yet lightly moisturized. I applied my usual sunscreen after this serum, but because of the weird consistency of the serum, my sunscreen was more difficult to spread evenly. I tried using it again once or twice more, but it is really just a pain to use if you need to apply anything on top of it. Maybe if I only used it at bedtime by itself I could handle it, but I've been using a retinoid gel nightly for my acne, so that's out. I probably won't get any use out of this. Bummer.

Touch In Sol - Feel Like Honey Moon Skin Base (Full size $20)
First of all, I find the name of this product to be strange. Like maybe someone who doesn't speak English very well picked the name? And I'm not particularly sure that I want my skin to "feel like honey moon"... whatever that is. :-/ But I tried it once anyway, and as expected, I didn't really care for it. It feels like honey, that is certain. Very similar to the product above this. And it has weird golden flecks in it that don't seem to go away when you rub them in... maybe that's the "moon" part?! I seriously don't know!

Anyway, this product claims to be an all in one moisturizer and makeup base. MAYBE it works well for others, but I just can't bring myself to use it again.

So, that's it for the August edition of GlossyBox. Thanks for reading. I hope you all learned something new today. ;)

--Dixie


Monday, October 8, 2012

Frankenstein Nail Art

What's up, Buttercups?

Hooray for October and the excuse to do Halloween-themed manicures! ;)

I'm still pretty new at this. I don't think I have ever actually done Halloween nail art. So I started out slow and went with a Frankenstein fingernail.

To click or not to click...?
The nail polish I used for this Frankenstein manicure is Sally Hansen's Mint Sprint. This manicure was almost entirely my husband's idea. I think it is cute that he likes to help and I am grateful that he is supportive of my obsession. Maybe all those years of me supporting his obsession with his vehicles have paid off... :D

Anyway, we both felt that it was lacking something. We thought maybe I should add something to the other nails? Neither one of us could decide what I should do, so naturally I did nothing.


I used a Sally Hansen nail art pen to draw the black details. I'm not sure why I didn't think to take a photo of the pen. The pen is really easy to use, however, I don't typically get great results with it. You'll see what I mean on the close-up photo below. :-/


I really didn't want to post this close-up because it shows ALLLL the imperfections. The streaks and the bubbles! Not to mention the color in this photo is completely off. The other two photos are color accurate.

Although I let the nail art dry for a considerable amount of time, it still streaked when I went over it with top coat. Nevertheless, I got several compliments on my nails. The imperfections weren't very noticeable in real life, but of course you can see all the ugly details in the macro shot.

I have since stepped up my game in the Halloween nail art department and I'll work on getting those pictures up soon. Thanks for stopping by!

--Dixie

Thursday, October 4, 2012

Zoya - Envy

Hello!
Below are photos of another one of the Zoya polishes I purchased a little while ago. This one is called Envy. It makes sense... it's green. Unfortunately, it is SUCH a dark shade of green that it basically looks black once on the nails. I don't have a problem with black nail polish, not one bit, but I purchased this because it was green! Oh well, I'm sure I'll live. :)


Above is a photo of one coat of base coat and two coats of Zoya Envy. There is no top coat. Also, I tried out something new on my accent nail. Well... it's new to me. The first person I ever saw use this technique with loose glitter is Sam on The Nailasaurus. She is VERY good at nail art... you should absolutely check out her blog. 

The first time I saw her do a fingernail with glitter like this, my jaw dropped. Not only is it super gorgeous, but it looked like a tremendous undertaking. I mean... WHO actually takes the time to place loose glitter on a fingernail one-by-one until the whole nail is covered? Apparently Sam does, and once she did a tutorial on how she does it, I realized I could too. And it doesn't take that long! It took me a total of 2-3 minutes, which I think is quite fast.


Per my husband's suggestion, I added a coat or two of Hard Candy's Mattely In Love to the nails without the glitter. He is typically very helpful when I am trying to be creative, and this time was no different. It was a nice touch for sure. HOWEVER, I was reminded how much a matte topcoat can shorten the life of a manicure. :( The glitter nail could have lasted for quite a while, but the other nails started showing wear within a day. 


This is a photo of the pot of glitter I purchased recently. It is going to last me FOR-EV-ERRRR. Unless I spill it. Don't say that! You'll jinx me! :O

I purchased this glitter along with some other nail art supplies from The Born Pretty Store. This is where Sam from The Nailasaurus purchased her glitter, and I wanted to get the same stuff she used. PLUS... that pot of glitter only cost me $2.38. And although this store is located overseas, the shipping is free.

Although I was disappointed with the shade of the polish, I think this is one of my favorite manicures so far. I'm impressed with how the accent nails turned out and I will definitely be using this technique a lot more. I hope you enjoy!

--Dixie