Monday, June 25, 2012

Essie Nail Polish Giveaway!

Happy Monday! ( I know, grumble grumble, I hate Mondays, grumble)

As I mentioned in my previous post, I have a surprise for you!

I stumbled upon a small collection of polishes that Essie released sometime between Spring and Summer this year. Poppy-Razzi is a collection of four very pretty neon pink and orange shades. When I purchased them I immediately wanted to share them with everyone!

I decided to do a giveaway to celebrate the fact that I've kept at my blog for as long as I have. There have definitely been moments when I thought I might not continue posting, but then I get compliments and/or new followers and that motivates me to keep going. I also got hundreds of hits on my blog recently because of the OKC Thunder fingernail art I created. Apparently if you google "OKC Thunder Fingernails", my blog is the first result. Makes me feel kinda famous...? :-P Okay, now I'm rambling...

First I'll be posting photos of the polishes I'm giving away, as well as swatches of the polishes so you know what you're entering to win. There will be a BUNCH of pictures. Keep reading to get the details about the giveaway!

Essie's Poppy-Razzi Collection: Lights, Camera, Action, Bazooka

Better shot of the colors

All of the polishes above would be what I consider neons. They're not neon like highlighter green neon, but they are quite bright and eye-catching. Lights tends to lean more cream/jelly, while the other three colors are definitely jellies. They all dry to a satin/matte finish, so they all require a top coat to make them as shiny as they are in my photos.

Essie - Lights


Lights is the first polish in the collection. As I mentioned above, it is a cream/jelly. It has a good formula that applies easily, and what you see in the photos above is two coats of Lights with one coat of Sally Hansen Insta-Dri Anti Chip Top Coat. 

I'm not gonna lie. I am NOT a fan of pink. You won't see me wear pink nail polish very often at all. I'm just not drawn to it. And I honestly only purchased this one because I liked the other 3 colors so much, so I thought what the heck? However, once I had it on my nails, how could I not like it? Look at how pretty it is! I could see this on my toes, too. :) Anyway, moving on.
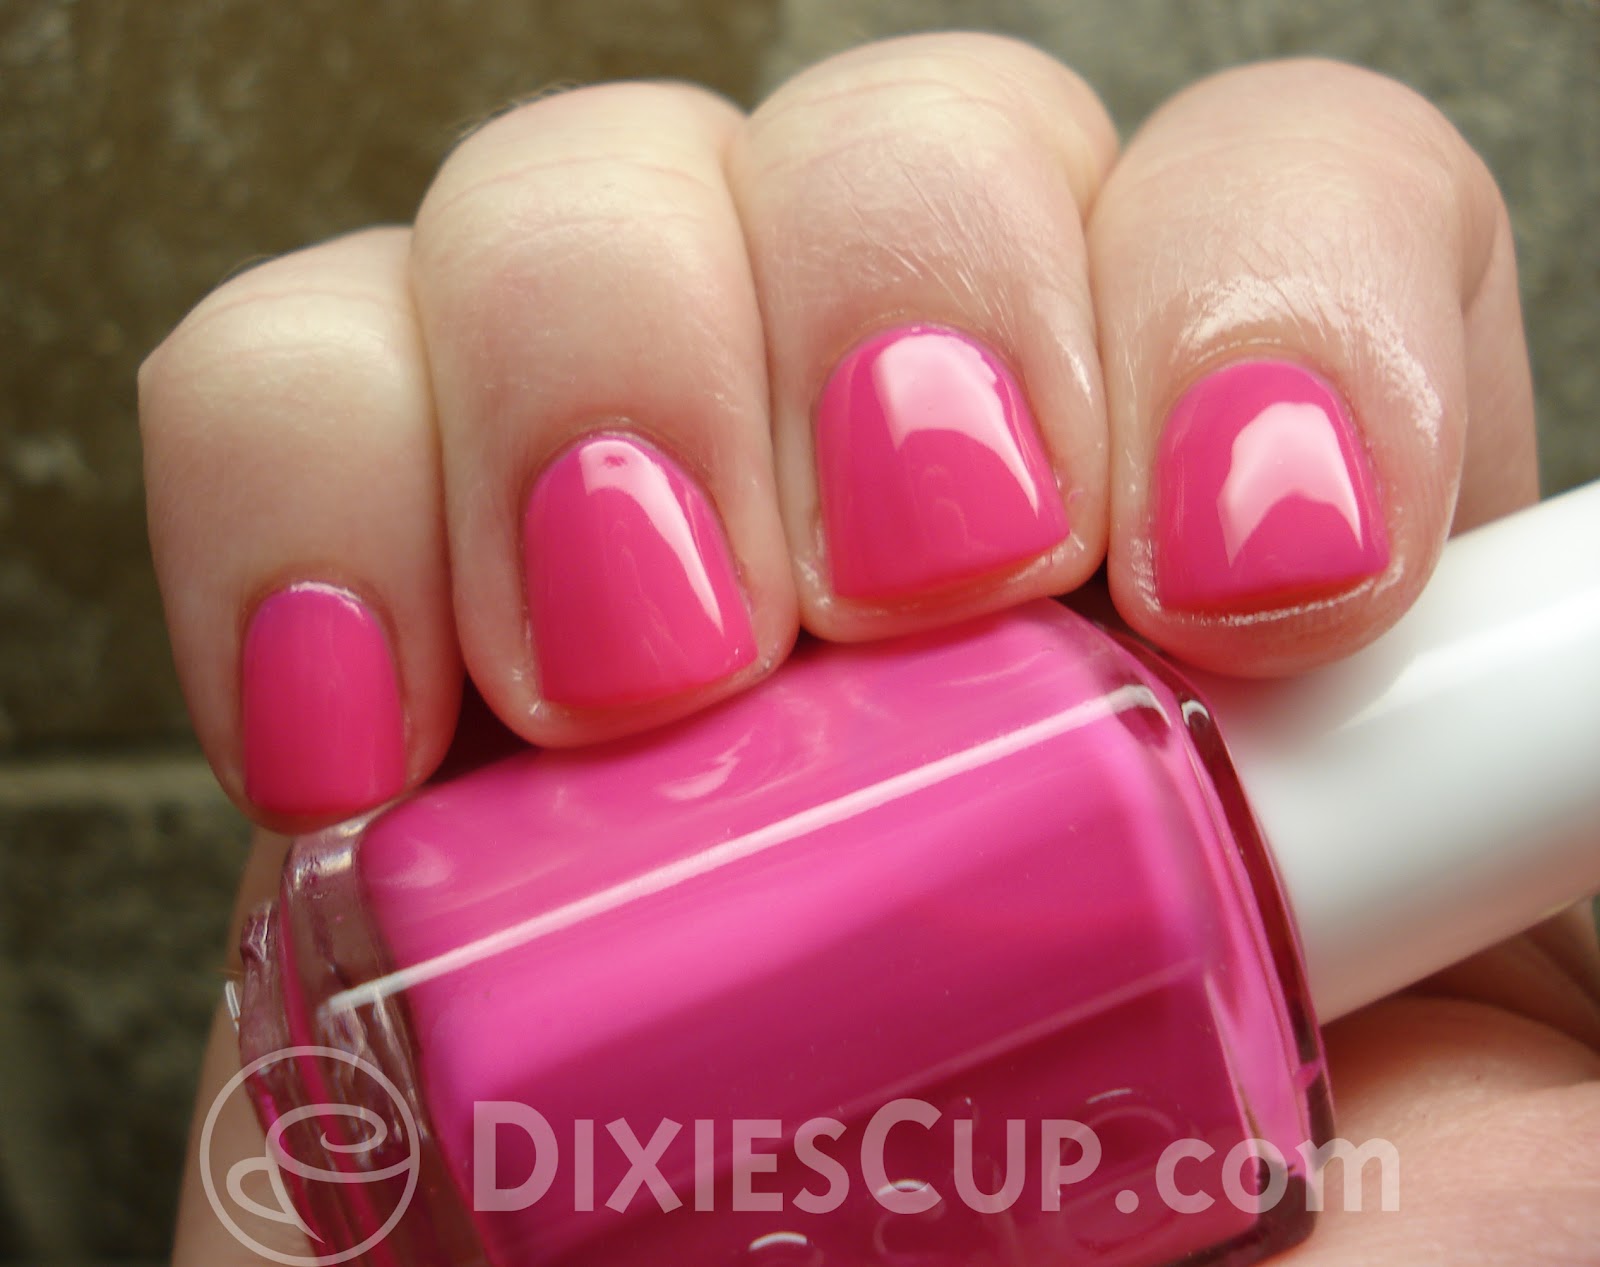
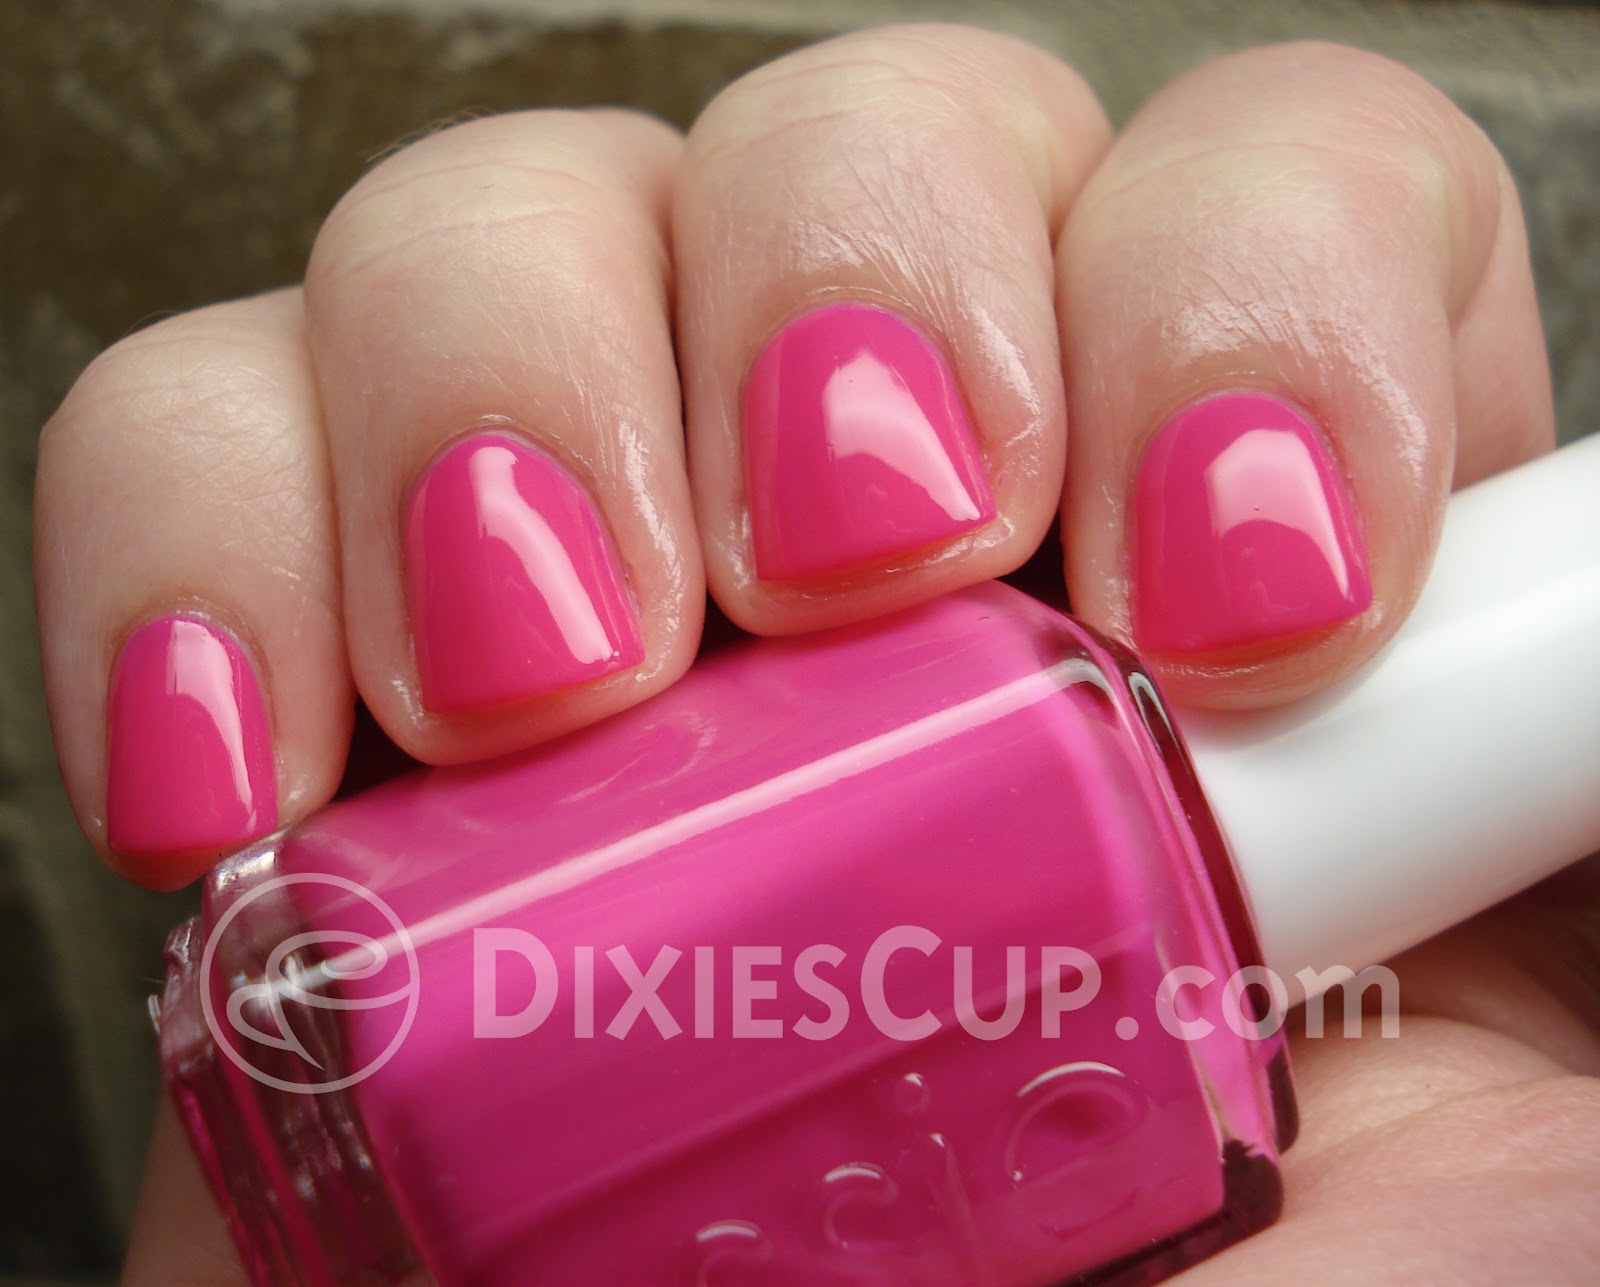
Essie - Camera


Camera was difficult to photograph. Actually, so were the next two polishes as well. It could be because they are jellies, it could be my lighting, it could be my camera... maybe all of the above. But I would describe this color as more of a coral reddish pink than it appears in the photos. The color you see in the bottles is closer to the true color. Whatever the case, it is a very pretty shade that turned out to be my favorite from the collection.

It didn't apply quite as smoothly as Lights, but it wasn't a total pain either. The photos above are two coats of Camera with one coat of the same top coat.

Essie - Action


Ugh!! I wanted SO bad for Action to be awesome. It is such a pretty tangerine shade. It looks kinda awesome in the photos, but the formula of the bottle I purchased for myself is horrible. I'm not sure if it is just my bottle, or if all of them are like this. I can't imagine that Essie would release such a bad bottle of polish on purpose. Right?

Anyway, when I went to apply the first coat, I was wiping the brush on the neck of the bottle and I noticed that the polish looked like a very clearish orange color with milky-looking streaks running through it. I thought, "this can't be right!" So I shook it vigorously for a few minutes, but with no luck.  :( The polish didn't change at all. 

I decided to go ahead and paint it on anyway, hoping that it might turn out better than it was looking inside the bottle. The first coat was stupid. Streaky and gross. Nevertheless, I continued with the second coat, and it DID improve a little. Finally, with the third and final coat, it looked like the decent polish that you see in the pictures above. So the photos above are 3 coats of Action with one coat of top coat. I wore this polish for a day or two, and it didn't last as long as the others did. Sorry I didn't have a lot of good things to say about this one.

Essie - Bazooka


Bazooka is the last polish of this collection, and thank GOODNESS I only have nice things to say about this one! This polish was nice and pretty after two coats and the formula was just fine. It is a pretty shade of dark orange that leans to red. I think that is all I really have to say about this one, after all the bad things I said about the previous one!

Now that you've seen all the pretty polishes, be sure to enter the giveaway below to win your own brand new, unused bottles of the same colors. :)


Rules of Giveaway


This giveaway will end at 12:01 am (EST) on Monday, July 23rd 2012.
It is open to U.S. Residents only. Sorry to anyone this excludes. :( I'm just not quite sure what it requires to mail nail polish to other countries and I don't want to promise anything I can't deliver. I promise I'll work on that.


How to Enter

All you have to do to enter is fill out the Rafflecopter form at the end of this post. There are a total of 4 possible entries to be earned. The first two fields are mandatory and for filling them out, you will receive two entries. The other two are optional and will each earn you +1 entry, but obviously the more entries you have, the higher your chance of winning.

In case you are unfamiliar with the process of following a blog via Google Friend Connect, it is really quite simple. You just have to have an account with Google. (There are other ways to follow besides with a Google account, too) If you have a gmail account, BAM! You're already there. If not, it's pretty simple to create an account. Then click on the little blue button on the right side of this page that says "Join this site". It will likely prompt you to log in. Then you just select to "follow publicly".

Thank you and good luck!

a Rafflecopter giveaway

Saturday, June 23, 2012

How To Fake a Perfect Manicure

Hey Hi Hello!


Several people have questioned how I paint my nails without getting polish all over my cuticles. The answer is that I don't! My hands are definitely not steady enough to do the manicures you see on my blog without being a little messy at first. The purpose of this post is to hopefully answer some of your questions and help you do your own beautiful manicure.

If you have already perfected your clean-up method, then this post might bore you. But if you're searching for the trick to a neat and clean-looking manicure, then you're in the right place! :)

A fair warning: this post is kind of pic heavy. I find that I am a visual learner, so I think lots of pictures might help things make sense for you too. 


One of the most important things you'll need to clean up your manicure is 100% pure acetone. Other polish removers do not work near as well for this particular method. 100% acetone is very drying and can cause some serious damage to multiple types of counter tops and surfaces, so be careful where you use it. Don't pour it into a plastic container because it WILL eat through most plastics. I have poured small amounts into the bottle cap before, but Sally's also has those small little glass dappen dishes for under $1.00. 


In addition to the 100% acetone, you will need a good clean up brush. The brushes in the picture above are from the craft section at Walmart, but you can find a variety of brushes just about anywhere. I recently bought a package of nail art brushes at Sally's (after this picture was taken) and I think I might have found a new clean up brush. All you really need though is a fairly thin brush with stiff, short bristles. I primarily use the top brush. 


 The photo above is typically how most of my manicures look before clean up.


I apologize for the fact that these pictures have a different color of nail polish. I needed assistance in taking some of these photos and had to take them on a different day. Does anyone else wish that they had a 3rd or 4th hand sometimes? 

ANYWAY... I typically paint all five nails on one hand with my first coat of polish and then clean up. I then proceed to the other hand. By the time I'm finished cleaning up my other hand, the first hand is ready for its second coat of polish and its second round of cleanup. You can always choose to do a complete manicure and clean everything up at the end, but I've noticed that polish seems to come off a lot easier if you do your clean up while the polish isn't completely dry. 


To clean up, you'll need to dip your brush in the acetone and wipe off the excess on the side of the container. Try to stay as close to your cuticle as possible while you sweep the brush around your nail. Depending on how dark your polish is, you may have to do this a couple of times, but with 100% acetone it should come off pretty easily.  

You may also want to have a napkin or paper towel around to wipe the brush on after you've gotten some polish on it. I always work on top of a paper towel, so I just wipe my brush on that.


Back to the original polish color of the messy nails at the top, this is the manicure AFTER clean up. :)


And again.


Another thing that contributes to a nice looking manicure are healthy cuticles. Really dry cuticles tend to crack, peel and bleed and they just don't look pretty. They also don't feel very good. If you keep your cuticles pushed back and you use lotion or a cuticle oil of some sort regularly, you shouldn't have these issues as much. There are so many products out there that help out with cuticle care, you just have to look!


This particular oil is super easy to apply because it has a brush applicator. I use it as often as I can. My job requires me to wash my hands A LOT, so my hands tend to get very dry. I just keep lotion nearby and moisturize as often as I can. 

Well, that's all for now. I hope you all learned something today!

Also... keep an eye out for my next blog. I'll be posting a surprise for you! :)

--Dixie

Thursday, June 14, 2012

New Blog URL!


As you all may or may not have noticed... my blog now has a much shorter and easier URL!

All you have to type to get here is DixiesCup.com.

I know there are several times throughout your web browsing escapades that you consider visiting my blog, and then you think to yourself in the most whiney voice you can muster "But her blog URL is so longgggggggggg."

Well. YOU'RE WELCOME. No more excuses.

Until next time... :)

Revlon - Bare Bones & Essie - Mademoiselle

Hellooooooo!

Today I have a classic manicure for you. I borrowed this idea from one of my favorite nail blogs, LetThemHavePolish.com. It includes Bare Bones from Revlon's Colorstay line, and Essie's Mademoiselle. The only difference is that I used Bare Bones and she used Essie's Brooch the Subject. The colors are VERY similar as far as this manicure is concerned.

Revlon - Bare Bones without flash.

As you can see above, Bare Bones is a tan color. It is very pretty by itself, but I REALLY wanted to see how adding Essie's Mademoiselle would transform it.

Revlon - Bare Bones with flash.

Bare Bones applies just like the rest of the polishes I have used from this line, HOWEVER, it seemed to take quite a while to dry. I'm not sure if that is because of the way I applied it, or if its the formula. I will definitely use this color again, so I'll pay attention as to whether or not it dries as slowly. The photos above are 2 coats.

Topped with Essie - Mademoiselle without flash.

And here it is covered in 2 coats of Essie - Mademoiselle. Unfortunately I don't have a picture of Mademoiselle on my nails by itself, but it is a sheer pink jelly. The idea of layering these two polishes was to create a nude color with a little something extra. After adding Mademoiselle, the tan color transformed into more of a pink-ish nude. And doesn't it just look so squishy?! I really love it.

Macro shot of finished product.

Different shot of the finished product without flash.

I got a lot of compliments on this manicure and I definitely plan to do it again. I'd also love to wear Mademoiselle by itself, and when I do, I'll be sure to share it with you.

Don't forget to click on the pictures to make them bigger! :)

Thanks for hanging out!

--Dixie

Tuesday, June 12, 2012

Revlon - Bold Sangria & Essie Luxeffects Pure Pearlfection

Happy Tuesday!!

(I'll give you a minute or two while your eyes adjust to my new layout.)

Today I have a manicure I did a while back, but I really wanted to share it because it involves one of my current favorite lines of nail polish... Revlon Colorstay.

As usual, all photos are clickable to enlarge.

Without flash.
It is very difficult to see from this photograph, but Bold Sangria is a deep plum color. At least that is how I would describe it. My husband tells me I'm colorblind. Anyway... moving on. :)


Without flash.
To make things a little less boring, I added a simple accent nail with Pure Pearlfection from Essie's Luxeffects collection. I thought about doing it on all of my nails, but Bold Sangria is so yummy by itself I couldn't bring myself to do it. :D


With flash.
In this photo taken with the flash you can get a better idea of the color of this polish. Wouldn't you say plum-ish?

And similarly to the other polishes from this collection, I would describe this as a creamy jelly. It's super shiny, with a little help from the Seche Vite top coat. It applied like a dream in two coats, and lasted for about 4-5 days before it started to fall apart.

Macro shot of accent nail.

Macro shot.
It was a little difficult for me to get a good macro shot of this color, but I did my best. I hope you enjoy this color as much as I did, although this seems to be a little out of season now.

Thanks for gawking at my nails!

--Dixie

Monday, June 4, 2012

OKC Thunder Fingernails: China Glaze - Splish Splash & Orange You Hot?

Hello Thunder Fans (and everyone else)!

After posting my last "OKC Thunder Fingernails" manicure, I stumbled upon several other far superior versions of Thunder manicures. I felt a little silly for calling my plain blue fingernails a themed manicure, so I'm back again with some improvements. 


My best rendition of the basketball in the Tunder's logo
I started by applying 2 coats of China Glaze's Orange You Hot? to my thumbnail. After that was dry, I used a smaller brush to paint the blue portion (China Glaze's Splish Splash) you see in the photo above. I then used a fine-tipped nail art brush I purchased from Sally's Beauty Supply to draw the black lines of the basketball and then outlined it in white to mimic the logo as much as I could. It's not perfect, but I think I did pretty good for my first try at free-hand nail art.

Other thumb
The black lines were done with Pure Ice - Black Rage, and the white outline was done in Finger Paints - Paper Mache.

China Glaze Splish Spash & Orange You Hot? from the Summer Neons 2012 Collection
Here's a shot of the rest of my hand. I did an accent nail in orange with three different colors of polka dots using my dotting tool (also purchased from Sally's).

Other accent nail
 The dark color is Essie - Midnight Cami. It is actually a dark blue, but it always looks black. The middle color is Splish Splash. And the last color is Pure Ice - Silver Mercedes.

After letting things dry as long as I could stand it, I topped everything off with Sally Hansen's Inta-Dri Anti-Chip Top Coat. Tada!

Also: The Thunder won again! :) :)

Thanks for stopping by...

--Dixie

Saturday, June 2, 2012

May Birchbox

For the record, this post is taking place BEFORE I received the June Birchbox. YES!

Gossip Girl themed box
I do not watch Gossip Girl... so I don't know what that means. Ha. :D


The back of the card. I don't know why I've never posted this before?


twistband - Skinny Headband (6 pack - $20)
These are just plain silly. Looks like something I would make at work out of the elastic loop on my mask when I need a hair tie. I mean, I'll use it, but 20 bucks for 6 of them? Meh.

beautyblender - blendercleanser (Full-size $17.95)
This is basically just soap. It is soy-based and claims to remove built-up bacteria and oil. It smells funny, too. I have some brush cleaner that I purchased from Sephora for much cheaper... so I will use this, but I won't repurchase.

Arquiste - L'Etrog perfume (Full-size $165)
Dr. Jart + - Waterfuse BB Cream (Full-size $32)
Color Club - Nail Polish in Disco Nap (Full-size $8)
The photo below will tell you more about the perfume. It smells okay. Definitely not $165 okay though. :-/

Dr. Jart + BB Cream: BB creams seem to be the "thing" right now. And I love them. But I'm kinda ready for everyone to stop doing their own version and move on. This one is not good for my oily skin. As soon as I put it on, my face looks shiny. I don't need that.

And can I just say... if it wasn't for them throwing some nail polish in to this box, the whole box would've been a flop. Color Club - Disco Nap would not have been a purchase I would have made, but when I painted it on my nails, I LOVED it!! Sorry I didn't take pictures of this color. I regret it now, but I will definitely use it again soon.


Notecards (Set of 12 $10)
What?! This is a May Birchbox. MAY. Not FEBRUARY! And a notecard? Bleh.

Okay... There you have it. Caught up on the Birchbox posts until my June box comes in. :)