Showing posts with label Red. Show all posts

Wednesday, November 28, 2012

Winslow Wednesday - O.P.I. The Spy Who Loved Me

It's time for WINSLOW WEDNESDAY again!

Time flies when you're being lazy... or something like that. ;) This past week or two I have been having some unusual back pain that I can't seem to get rid of, so I've been sitting around not doing much. I scheduled a massage for this Friday and I'm really hoping that will help. I've tried Icy Hot and heating pads and Ibuprofen... but to no long-term avail. :(

Anyway, enough whining. Onto the reason you're really here!

Winslow choosing OPI The Spy Who Loved Me
It took some coaxing, but Winlsow finally chose OPI The Spy Who Loved Me, which is from the Holiday 2012 Skyfall Collection (celebrating 50 years of James Bond - 007). I've purchased a few other colors from the same collection, but this is one that I think I was most excited about. I love a good red polish, and this is different from the others I own. It has a gorgeous golden shimmer in it that sort of makes it glow.


It is more difficult to see on the nail in the photos, but you can definitely see the golden shimmer in the bottle. In person, the red is MUCH more vibrant and sparkly. It would look just fantastic on its own, but I decided to add some glequins (from Born Pretty Store) to it for even more sparkle. My husband said it looks like I'm ready for prom! :P


The formula on this polish is MAGNIFICENT. I wish all polishes would apply like this one. It doesn't pool in the cuticles and it stays right where you put it. It is almost 100% opaque in one coat, but I did a second coat for photos. I recommend two coats because it added a bit more depth to the sparkle. 


Here is a macro shot for good measure. This shows the shimmer the best. 

I think these turned out a bit more fancy than what I was going for. It would look great for a holiday party or some other special occasion (like prom). Next time I'll stick to the accent nail. But I'll definitely be wearing this red sparkly goddess again!

Thanks for dropping by!

--Dixie

Wednesday, October 31, 2012

1Q32 Instant Gellish

Happy Wednesday, Dixie's Cuppers!

The following post is about nail polish, but it differs from the variety of nail polish I typically blab about. Today I will be showing you a UV/LED light-cure gel polish from 1Q32 Instant Gellish. I was immediately interested in this product because it claims to be tough and long-lasting like your typical light-cured gel manicures, but with only ONE STEP. In the past I have visited nail salons and received Shellac manicures that are well known for lasting at least 2 weeks. I really enjoyed those manicures because they were low-maintenance; however they required multiple steps like base coats, primers, pH bonders and cleansers to remove the sticky layer after curing. 

Keep reading to learn more about this product and to see photos!


The process of prepping your nails for this polish is the same way I typically would prep for a normal nail polish. After that, the application of the 1Q32 Instant Gellish is very easy. Below I have listed the step-by-step instructions:

1. Push back your cuticles with a cuticle pusher. 
2. Cleanse the nail surface with a nail polish remover to remove dirt and oil. 
3. Apply a layer of 1Q32 Instant Gellish color onto your nail, and avoid staining the skin.
4. Place under a UV or LED lamp to harden and dry your 1Q32 Instant Gellish color. (My bottles said that with a UV lamp the cure time is 2-3 minutes and with an LED lamp it is 20-30 seconds.)
5. Apply 2nd layer of color and repeat step 4 to harden and dry.
6. Your nails are polished, shiny, and dry to the touch instantly. 


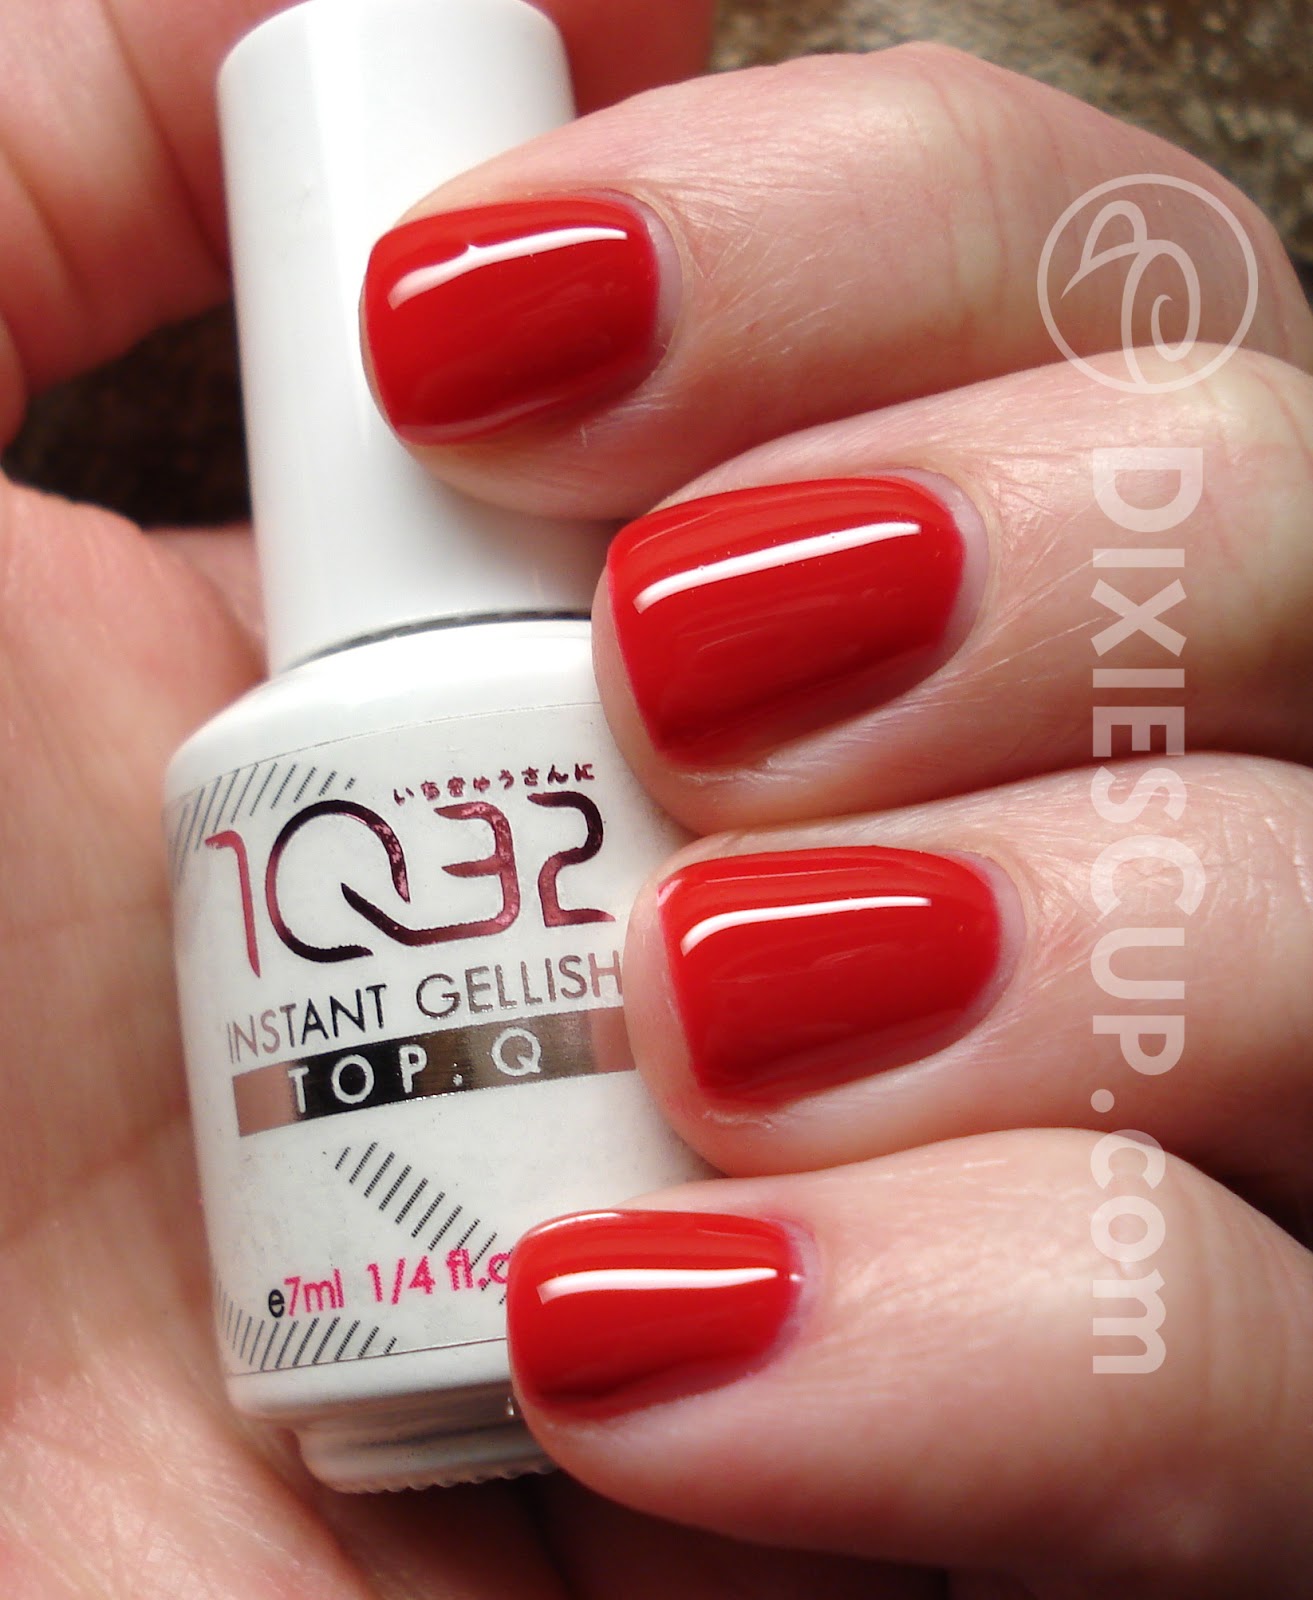
All of the photos except for the very last one show two coats of 1Q32's QB45 which is a lovely, bright cherry red! I used an LED lamp that I purchased at Walmart, so my nails cured perfectly in 30 seconds. The formula of this polish was a bit thicker than a typical nail polish, so there was a slight learning curve with the application. However, once I got the hang of it, it really wasn't bad at all. I would also say that the brush was a bit too wide for my nail beds, but I just cleaned the polish off my cuticles before I cured it. In the end, I was extremely pleased with how my nails looked and I was beyond ecstatic that my nails were completely dry and I could get back to my day without worrying about smudging my manicure!

When comparing this product to the Shellac manicure I spoke of earlier, I would say they are equal in quality and strength, but this product seems so much easier to use because there are fewer steps. 

Click to enjoy this polish in all its glory!

Is that not the most glossy, gorgeous red polish you've ever seen?! I still can't believe that all I used was this tiny bottle of polish and an LED lamp. There was no base coat or top coat needed. The product claims to give you weeks of maintenance-free wear. I can definitely vouch for the strength of this polish and I can see how you could get a couple weeks worth of wear from it. I only wore this polish for about 6 days, and at that time it was still holding up quite well.

The directions for removing this polish are to soak your nails in the company's Liquid-Q for 5-10 minutes and rub the color off with an orange stick or finger pads. The company is located in Japan and they could not ship that product due to strict airmail regulations, so they claimed that pure acetone would work just as well. I was a bad, bad girl and peeled the polish off one evening while watching television. :O I know, I felt guilty the whole time, but I just couldn't help it. Soaking my fingers in acetone at the time didn't seem appealing. I was very lucky that my nails were not damaged in the process. ;)

Without top coat

So what you see above and below are two very similar photos. The top one is simply two coats of the 1Q32 Instant Gellish color, while the photo below has the 1Q32.TopQ (top coat). I personally cannot tell a difference. The instructions claim that the top coat is optional, but that it can help protect your manicure and keep it shiny for a longer period of time.

With the provided 1Q32.TopQ top coat

If you are the type of person that likes to have nicely manicured nails, but you hate that your nail polish only lasts a day or two before chipping, I would highly recommend this product. Each bottle this size is approximately $24, and that may seem a little high for its size, HOWEVER you would pay at least that much for a manicure in a salon. You can get multiple manicures out of one of these bottles!

If you are like me and you love to change your nail polish 2-3 times a week, then this product may not be for you because it is definitely meant to be a long-wearing polish. :)

If you'd like to see the HUGE selection of colors available, visit www.1Q32.com. Also, go like their Facebook Page so you can receive updates about specials they are running!

Thanks SO much for stopping by. I hope you have a great week!

--Dixie

**1Q32 Instant Gellish provided for review. Please read my disclosure policy for more information.**


Saturday, September 15, 2012

Colorful Hair

Happy Saturday!

I am celebrating today's dreary weather by staying inside and being extremely lazy. I really wanted to share pictures of my new hair color with you all because I am VERY thrilled with how it turned out.

Click to Enlarge!
I always love doing fun new things with my hair, but I have continually had the same red hair for over 5 months now. So when I stumbled across a photo on Pinterest that showed a girl with red and purple hair, I had to try it out. I was slightly nervous because I've never tried anything quite so dramatic with my hair before, but here we are anyway! 

I decided to go with "peek-a-boos" so that the bright purple is a bit more discreet when I need it to be. When I want to show it off more, I just have to pin my hair back a little. 


I know bright colors aren't for everyone, so I won't be offended if you don't like it. :-P 

Also, I want to thank my hairdresser, Haley, for always doing such a fantastic job with my hair. She always handles my quirky requests without flinching, and goes above and beyond to make sure I am happy with the results! If you live in the Oklahoma City or Yukon/Mustang area and are interested in having Haley make your hair beautiful, just shoot me an e-mail and I'll give you her contact info (with her permission of course). :)

--Dixie

Friday, August 31, 2012

OPI & Wet N Wild Jelly Sammich

Hello, lovely people!

I'm quite excited to share this manicure with you all today. It's just perdy. The kind where I can't stop staring at my nails. 

I used two polishes: OPI MonSooner or Later & Wet N Wild Glamorous from Fergie's collection. Thanks to my awesome coworker and friend, Heathen, for the gift of the lovely gold glitter!

Click to enlarge! 
A lot of you have likely heard of a jelly sammich manicure. I suppose you could also say "sandwich", but I prefer the term "sammich" because it is fun to say. Anyway, for those of you who are NOT aware, a jelly sammich simply consists of a jelly nail polish and a glitter. You paint a coat or two of the jelly polish, followed by a coat or two of the glitter, and then one last coat of the jelly polish. Hence the term "sammich" because you've sandwiched glitter in between the jelly polish. 

You must use a jelly-type polish because they are fairly sheer and this allows the glitter to peek through. Each jelly varies on its level of sheerness, and the one I chose was not as sheer as I would have liked, but it still worked well enough.


I tried to take several different shots that might show the glitter a bit better, but unfortunately the photos do not do this justice. It was a lot easier to see the glitter in person.


I REALLY love the shade of MonSooner or Later. It is a shiny orange/red jelly that is fully opaque in two coats. This is the first OPI polish I ever purchased, and I bought it over 6 or 7 years ago. It is such a versatile color and has the typical great formula of OPI polishes. I can't believe I haven't used this polish more, I just forgot how awesome it is. 

All of these photos have a base coat, two coats of MonSooner or Later, two coats of Glamorous, one more coat of MonSooner or Later, and one coat of a fast-drying top coat. Believe it or not, all of that wasn't terribly thick on my nails. And since these polishes dry fairly quickly as it is, there were no major smudging issues. 


This last photo shows the glitter the best, I think. So pretty! And the best part is that the combination possibilities with jelly sammiches are endless. I can't wait to do more. :)

--Dixie

Sunday, July 29, 2012

Chanel - Pirate

Ohhhhhhh Sunday. 

The day before Monday.

Blergh.

ANYWAY! Look at what I got. :D (I'm slightly ashamed to admit that I actually got this polish for my birthday way back in April. I used it immediately on my toes, but never posted photos because you really don't want to see my toes.)

Chanel - Pirate
AMG!!! How pretty, right? My husband just so happens to read every single blog post, however boring or un-relatable they may be to him. He read THIS ONE about my desire to own this polish back in February and held on to the info until April. Then he wandered into Dillard's and purchased it. He deserves lots of bonus points for that!


As mentioned in the blog post that I linked to above, I feel that this polish is very similar to Revlon - Velvet Rope. Have I done a proper comparison yet? I'm glad you asked, because no I haven't!! In the bottles, I think Pirate might be slightly lighter, but I felt they were close enough to not have to own both. However, did I say "NO" when I opened the gift my husband got me? HA! No. ;)

Macro shot
Chanel - Pirate is a lovely deep red jelly. It wasn't necessarily the easiest formula to apply, but it wasn't horrible. The first coat was a bit tricky, but after applying a second coat, things smoothed out just fine. The top coat made everything look flawless.

I'm so happy I finally own this polish. I feel fancy when I tell people, "Yeahhh... it's Chanel."

EDIT: Chanel polishes are available at your local Dillard's. Most retail for $26, which is what this particular polish cost. A friend asked if I thought the polish justified the price tag. My answer is no. I think it is lovely, but I doubt I'd ever go purchase this polish on my own. I'd rather find a cheap duplicate. However, it made a FANTASTIC gift!


Just a reminder: all photos are clickable to enlarge. And just in case you DO happen to enlarge them, you might notice some small scratches on the surface of my nails. This is because I painted my nails and had to rush out of the house before I could snap any pictures. NOT because the polish is lame. Because it's not. For real.

By the time I got home that evening, they still looked okay, just a little scratched. I should have put on another quick layer of top coat, but I didn't think of that until it was too late. Bummer.

Thanks guys. Much love. Peace.

--Dixie

Sunday, July 1, 2012

Review: WEN Cleansing Conditioner

Heyyyyyy...

Prepare yourself for lots of blabbering and jib-jabbering (yeah, I'm aware how cheesy lame that sounds) about a product I really like.

Quickly though, if you somehow managed to miss my last blog post about the giveaway I'm doing, please CHECK IT OUT! It's FREE nail polish... who doesn't like that? :)

And now for the real reason I'm here: My review for the WEN cleansing conditioner. I could also title this blog "How To Keep Red Hair From Fading". 


You may or may not have heard of this product. As far as I know, at least in the Oklahoma area, this product is only available for purchase online. I first heard about it when a former coworker informed me that she saw an infomercial about it and it claimed to not wash out hair color. This information peaked my interest, but I was quite skeptical. 

If you know me very well, you know that I am always coloring my hair. My favorite color to play with is definitely red. I can hear some of you groan because you've tried red (and/or other colors), and it fades SO quickly. You either go to the salon or color it yourself and within a matter of 3-4 washes, it is no longer vibrant. After  8-10 washes, you basically can't even tell your hair ever had a hint of red in it. At least that is how it has worked for me. Yet I LOVE and cannot resist the confidence I have with red hair.

That being said, red hair color is so high maintenance that I've given up on it several times. I've tried a lot of things to keep it vibrant, but to no avail. So, as I said, I was very skeptical about this product, but I decided to give it a try anyway. I thought on it a lot because it is a little pricey, but considering it is essentially a 2-in-1 product, I convinced myself it wasn't that bad. ;) Read on to find out how much I like this product!


I took pictures of each section on the back so you can read the information for yourself. I am OBSESSED with reading every last bit of the backs of my product bottles, so in case there is anyone else like that out there, eat your heart out!


When I first read the directions, I thought that 10-20 pumps seemed excessive. I seriously thought they were just trying to get you to use too much product so you would have to repurchase more often. However, if you purchase this, you DO need that many pumps. If you use too few, the "cleansing" part of the cleansing conditioner isn't as effective. For my oily hair, that means that it doesn't wash out all of the oiliness. :( When I used this for the first time or two and discovered after blow drying my hair that it was still oily, I was very disappointed and almost threw it out. I was convinced that this product just wasn't made for oily hair. For some reason I cannot remember I decided to give it another go, and I managed to actually follow the directions. Genius, right?! This time around my hair felt very clean and oil-free, and it seemed moisturized and soft as well. Yay!

Once I figured out how to properly work this new discovery, I used it in place of my regular shampoo and conditioner. I used it every time I washed my hair for the next 3 or 4 weeks. It was amazing! My hair had somehow managed to maintain most of its red color. Yes, I'll admit my hair had faded a little, but not as much as it usually does. If you never washed your red hair with shampoo, but just got it wet in the shower, it will still fade. So I was and still am very happy with the results. The next time I had to color my hair was because the roots were growing out, NOT because the red had completely disappeared!

For whatever reason, I decided to give my shampoo and conditioner another go before I colored my hair to cover the roots. I guess I just wanted to see what would happen? SO MUCH red washed out in that ONE wash it was impressive. I don't know what I was expecting would happen, but it definitely wasn't that. 


A quote from the WEN website: "Unlike many ordinary shampoos, WEN® cleansers are made with natural ingredients and contain no sodium laurel sulfate or other damaging detergents. They don't lather; instead, they create smooth foam when mixed with water for shinier, healthier-looking, more manageable results." The part about it not lathering is very true, and it takes a while to get used to. I've used lathering shampoos all my life, but just because it is not lathering doesn't mean it is not cleaning. 

Now let me get this out of the way. If you have previously tried shampoos that claimed to not have sulfates and were disappointed, don't let that deter you from this. I have tried one or two that still seemed to be drying to my hair and scalp, and it also didn't stop the fading of my hair color. This one is different. 

Also, a shampoo pet peeve of mine? That damn John Frieda Radiant Red Shampoo that claims to "preserve and magnify vibrant red color". As far as I'm concerned, it is no different from any other shampoo out there. It has all kinds of sulfates in it and if your shampoo has any of that, I don't care how much the bottle says it, it will NOT prevent fading. 

**Steps down off soap box.** 


I will leave you with a couple of links for places you can find this product.
  • WEN® hair care by Chaz Dean - Official Site - http://www.wenhaircare.com/
    • This site is only if you want to buy a subscription to this product. It is $29.95 for a 30 day supply which includes a 12 oz. bottle of the cleansing conditioner as well as several other extras. I think it is a good site to learn about the product, but I personally hate having subscriptions to products. 
  • ChazDean.com
    • I like this site. I haven't yet purchased from it because I just discovered it while researching for this blog post. I like it because, unlike the QVC site below, you can purchase each scent separately. 
    • $32 + shipping (~$10+) for 16 oz. bottle
  • QVC.com
    • This is where I purchased the bottle you see in the photos above. Overall, I would say this is the site where I've found the cheapest cleansing conditioner, but there aren't as many options. I was able to buy the Summer Mango Coconut by itself, but I can't seem to find many other scents that aren't bundled with other products. 
    • $29 + Shipping (~$6-7) for a 16 oz. bottle. $40 for two 16. oz bottles.
  • You can also purchase this from Amazon.com or eBay, but you never know how much it's going to cost. I got lucky the first 2 times and purchased it cheap, but currently everything I can find is more expensive than the other sites I've mentioned.
The cleansing conditioner comes in multiple different scents, and I have found that they cater to different hair types:
Cucumber aloe - Fine hair, and those with oily scalps but dry ends.
Fig - Thick, coarse, curly hair, and any hair that is extremely dry/damaged.
Lavender - All hair types, this is their volumizing cleansing conditioner. 
Pomegranate - All hair types.
Summer Mango Coconut - All hair types. (Limited edition)
Sweet Almond Mint - Fine to medium textured hair.
Tea Tree - For anyone experiencing scalp issues like itchiness or flakiness.

Boy... I have rambled a LOT. I have so much to share about this cleansing conditioner, as well as my experiences with red hair. I will stop here and let you recover from reading my novel... If you've made it this far, thanks SO much for reading!

--Dixie