Friday, November 30, 2012

Zoya - FeiFei

Happy Friday!

Today has been a good day. I got a hot stone massage this morning, and my back has been feeling much better. Now I'm just going to relax at home today and write some things for you guys to read, and then I might read some of my book. 

The nail polish I am sharing today is the lovely Zoya FeiFei. I've had this one for a while, but I'm just now getting around to it. 

Clicky Clicky!

Please keep reading for more details and photos!


As you can see, Zoya FeiFei is a gorgeous deep blue that has various colors of blue and gold shimmers. It is such a complex shimmer polish and I absolutely love it. In the photos you see a base coat, 2 coats of FeiFei, and a top coat. I regret not adding a third coat of color for the photos because some nails appear a bit sheer. In person, those sheer spots weren't noticeable. The camera is very harsh!

As usual with Zoya polishes, the formula is good. I needed to clean up a bit, but that's not the polish's fault. :)


I love love LOVE this polish and will definitely be wearing it again. What do you all think of it?

Thanks for stopping by! Have a great weekend. :)

--Dixie

Wednesday, November 28, 2012

Winslow Wednesday - O.P.I. The Spy Who Loved Me

It's time for WINSLOW WEDNESDAY again!

Time flies when you're being lazy... or something like that. ;) This past week or two I have been having some unusual back pain that I can't seem to get rid of, so I've been sitting around not doing much. I scheduled a massage for this Friday and I'm really hoping that will help. I've tried Icy Hot and heating pads and Ibuprofen... but to no long-term avail. :(

Anyway, enough whining. Onto the reason you're really here!

Winslow choosing OPI The Spy Who Loved Me
It took some coaxing, but Winlsow finally chose OPI The Spy Who Loved Me, which is from the Holiday 2012 Skyfall Collection (celebrating 50 years of James Bond - 007). I've purchased a few other colors from the same collection, but this is one that I think I was most excited about. I love a good red polish, and this is different from the others I own. It has a gorgeous golden shimmer in it that sort of makes it glow.


It is more difficult to see on the nail in the photos, but you can definitely see the golden shimmer in the bottle. In person, the red is MUCH more vibrant and sparkly. It would look just fantastic on its own, but I decided to add some glequins (from Born Pretty Store) to it for even more sparkle. My husband said it looks like I'm ready for prom! :P


The formula on this polish is MAGNIFICENT. I wish all polishes would apply like this one. It doesn't pool in the cuticles and it stays right where you put it. It is almost 100% opaque in one coat, but I did a second coat for photos. I recommend two coats because it added a bit more depth to the sparkle. 


Here is a macro shot for good measure. This shows the shimmer the best. 

I think these turned out a bit more fancy than what I was going for. It would look great for a holiday party or some other special occasion (like prom). Next time I'll stick to the accent nail. But I'll definitely be wearing this red sparkly goddess again!

Thanks for dropping by!

--Dixie

Wednesday, November 21, 2012

Winslow Wednesday - OPI Don't Talk Bach To Me

Hey you guysssssss!

This blog post has been inspired by my favorite blogger Cris at Let Them Have Polish. She has a cat named Muffin and will occasionally allow Muffin to pick her nail polish for that Monday's manicure.  She calls this collaboration Muffin Mondays. I decided to allow my wire hair dachshund Winslow to pick my polish and dubbed it (oh-so-creatively) "Winslow Wednesday". 

Meet Professor Winslow
I posted a puppy profile about Winslow back in January shortly after starting this blog. Although it is fairly old, there's not much to add. He's basically the sweetest little pup ever. He loves to cuddle and is really good at pulling the puppy face, which helps him get basically whatever he wants. He's spoiled. Rotten.

Choosing OPI Don't Talk Bach To Me

Technically he picked the OPI Goldeneye polish on the right, but my camera was literally so slow, it allowed him to change polishes before it captured the photo. For blogging purposes, I went with what the photo shows!

Right Hand
Winslow chose OPI Don't Talk Bach To Me. This color is a part of the OPI Germany Collection Fall 2012. I wouldn't originally choose this color, but then I saw a swatch of it on a blog I think I mention quite regularly. You can see her swatch HERE. I've officially linked to the Let Them Have Polish blog THREE times in this post. I swear she's not paying me. ;)

I purchased this polish as soon as I had a chance to visit ULTA. Unfortunately it didn't really seem all that flattering on my skin tone. I decided this would be the perfect color to cover up with some nail art! Unfortunately, I was so focused on the nail art that I forgot to photograph the color by itself. Oh well, you can see the swatch that I linked to above. 

The formula of the polish was VERY easy to work with. It doesn't flood the cuticles, it self-corrects, and does fantastic in two easy coats. The OPI pro-wide brush is always a pleasure to work with. It's a shame that I don't really care for it on MY nails. :(

Left Hand - No Flash
Anyway, I decided on leopard print nail art because I hadn't tried it yet and it looked quite easy. Here is the link to the tutorial I used. Sarah at Chalkboard Nails is extremely creative and always has amazing nail art and tutorials. You should definitely check out her blog!

I used Essie - Lapiz Of Luxury (light blue cream) for the center of the spots and Nicole OPI - If The Blue Fits... (dark blue shimmer) for the outline.

The photo above is without flash and the one below is with flash.

Left Hand - Flash
What do you think? It's kind of an interesting-colored leopard, but several people recognized it as leopard print, so I must have done something right!

Thanks for stopping by! Hopefully Winslow will make continued appearances on Wednesdays. :)

--Dixie


Monday, November 19, 2012

Cult Nails - Behind Closed Doors Collection

OHMYGOSH you guys!

I should probably apologize in advance because if you don't already have these polishes... you're definitely going to want at least one (if not ALL) of them. These are my first Cult Nails polishes, and I can tell you they will not be my last.

Cult Nails is owned and run by a really awesome lady in Florida named Maria. For now her polishes are only available online at www.CultNails.com, but she is working on getting her brand into stores. I think it is only a matter of time. I need to stop blabbing and get on with the good stuff! 

Without further ado... The Cult Nails Behind Closed Doors Collection!

Flushed, Coveted, Disciplined, Bitten, Afterglow

Afterglow
I have to admit... when I purchased this set, Afterglow was the polish I was the least excited about. I love brown, but I felt like I already had this color. Until I put it on my nails!!!! Look at that. Just look at it! It is this lovely coppery-brown laced with little flecks of magenta/pink shimmer. I think it is extremely unique. 

What you see in the photos is a base coat, 3 thin coats, and top coat. I'm totally fine with the fact that it required 3 coats. It's beauty is completely worth it. :)

Afterglow

Bitten
Bitten was another color that I was a little "meh" about when I saw it in the bottle. I am SOOO glad I didn't pass it up. It is the prettiest shade of raspberry red mixed with a bunch of pink, magenta, and purple flecks. I love it a lot.

In the photos I used a base coat and 2 coats of the polish. No top coat, people! It's that pretty all on it's own. :)

Bitten

Disciplined
Ohhhhhh Disciplined! It is such a pain to photograph... but I think I did well enough that you get the point. I am a HUGE fan of gray, so naturally this was one of the colors I couldn't wait to wear. The fact that it had a bunch of purple, pink, and blue shimmer was icing on the cake. It's soooo soft and pretty!

This swatch has no base coat, 3 coats of color, and a coat of top coat.

Disciplined

Coveted
Coveted is one of the most unique polishes I've ever purchased. My favorite color is green, so naturally this is one of my favorites. It is a really awesome deep forest green jelly with green shimmer and big metallic green shards of glitter. There is so much to look at and admire! Unlike some glitter polishes, there is no fishing around in the bottle to get a sufficient amount of sparkle on your nails.

Pictured in the photos is base coat, 2 coats of color, and top coat. Love.

Coveted

Flushed
Last but not least... FLUSHED! This one was the first polish in the collection that caught my eye. I'm not typically drawn to purples and pinks so much, but I really really really like this one. The description on the website says "Flushed is a true 'Blurple' (blue/purple) buildable sheer with an intense purple/pink shimmer effect that appears to glow through the polish." I couldn't say it better myself, so I just borrowed the whole description! This polish is kinda magical.

What you see in these photos is a base coat, 2 coats of color, and a top coat. Some people say it requires 3 coats, but I achieved full coverage with 2. Perfect! :)

Flushed
I love all of these polishes a lot and cannot believe I waited so long to join the Cult. You can purchase all of these colors plus tons more at the CULT NAILS website. Go. NOW! ;)

Thanks for reading, I hope you enjoyed looking at these as much as I did.

--Dixie


Wednesday, October 31, 2012

1Q32 Instant Gellish

Happy Wednesday, Dixie's Cuppers!

The following post is about nail polish, but it differs from the variety of nail polish I typically blab about. Today I will be showing you a UV/LED light-cure gel polish from 1Q32 Instant Gellish. I was immediately interested in this product because it claims to be tough and long-lasting like your typical light-cured gel manicures, but with only ONE STEP. In the past I have visited nail salons and received Shellac manicures that are well known for lasting at least 2 weeks. I really enjoyed those manicures because they were low-maintenance; however they required multiple steps like base coats, primers, pH bonders and cleansers to remove the sticky layer after curing. 

Keep reading to learn more about this product and to see photos!


The process of prepping your nails for this polish is the same way I typically would prep for a normal nail polish. After that, the application of the 1Q32 Instant Gellish is very easy. Below I have listed the step-by-step instructions:

1. Push back your cuticles with a cuticle pusher. 
2. Cleanse the nail surface with a nail polish remover to remove dirt and oil. 
3. Apply a layer of 1Q32 Instant Gellish color onto your nail, and avoid staining the skin.
4. Place under a UV or LED lamp to harden and dry your 1Q32 Instant Gellish color. (My bottles said that with a UV lamp the cure time is 2-3 minutes and with an LED lamp it is 20-30 seconds.)
5. Apply 2nd layer of color and repeat step 4 to harden and dry.
6. Your nails are polished, shiny, and dry to the touch instantly. 


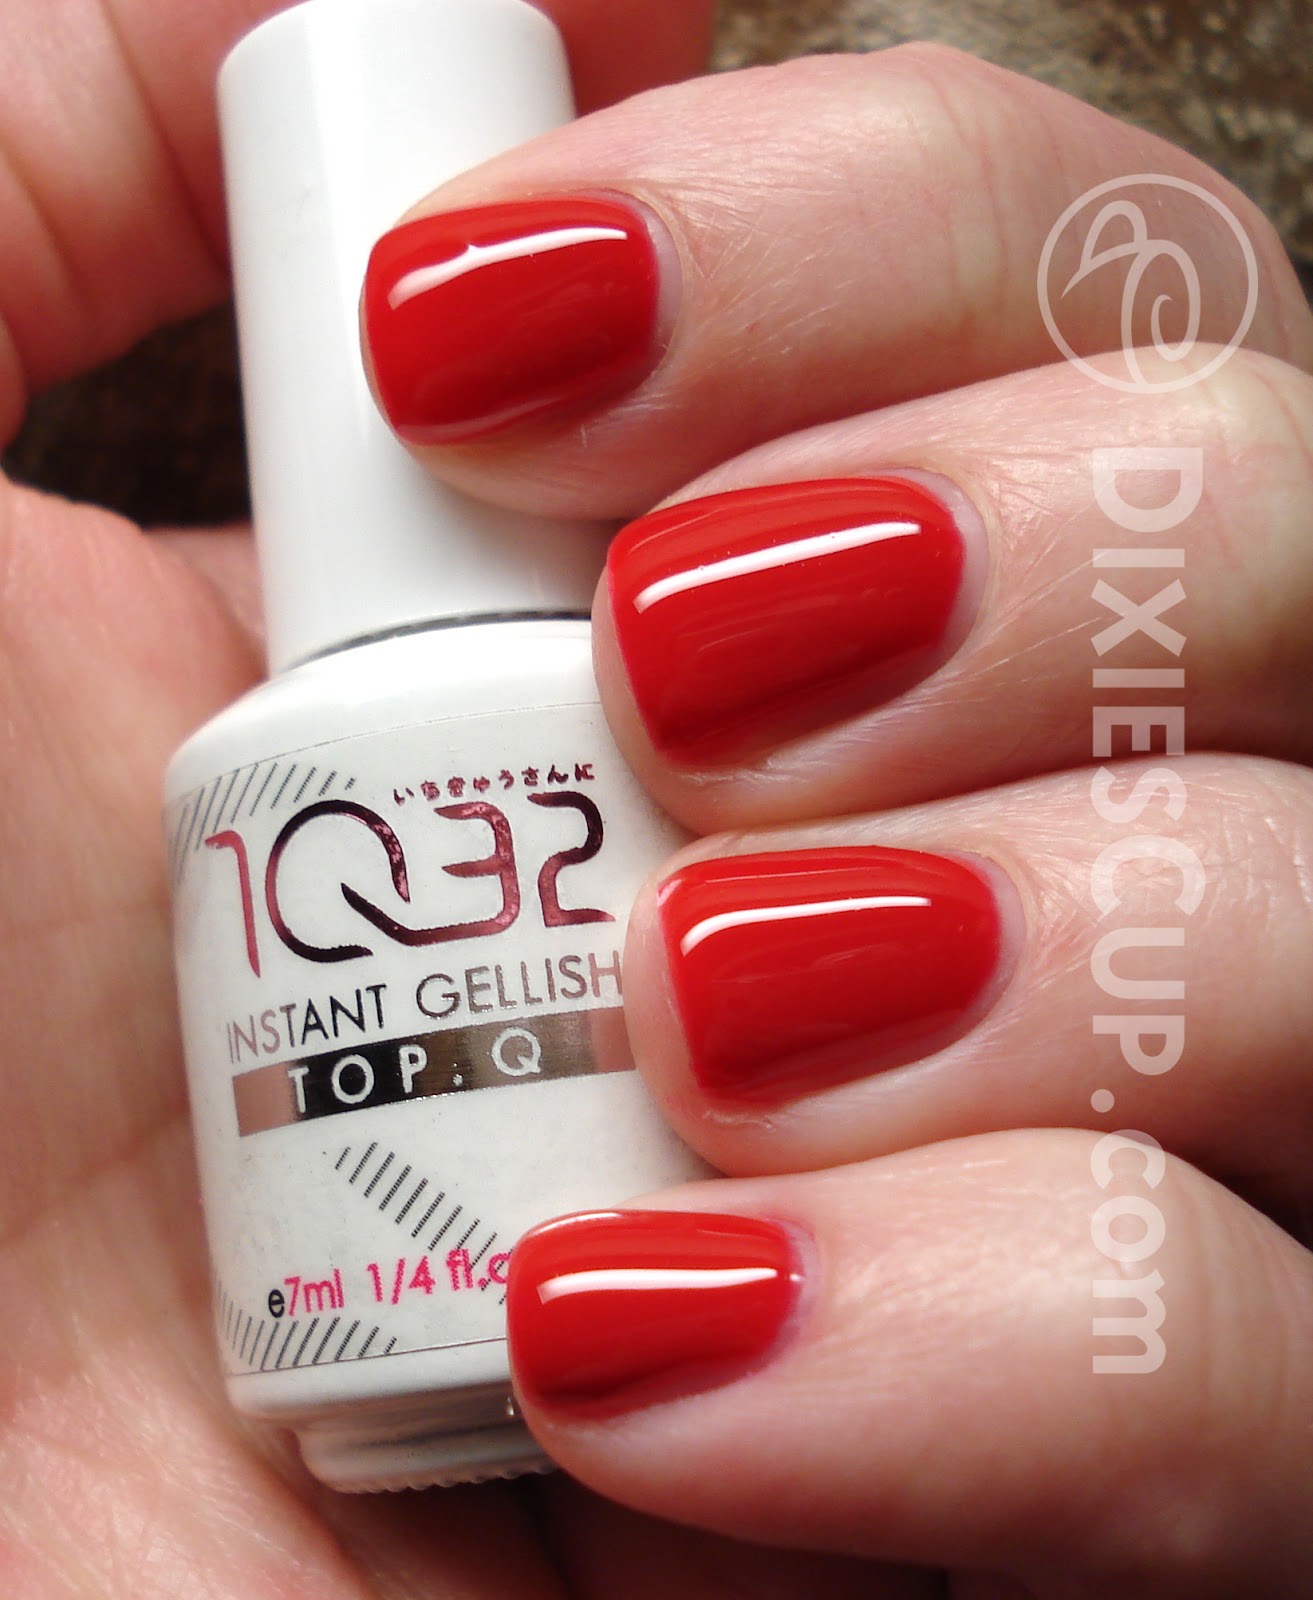
All of the photos except for the very last one show two coats of 1Q32's QB45 which is a lovely, bright cherry red! I used an LED lamp that I purchased at Walmart, so my nails cured perfectly in 30 seconds. The formula of this polish was a bit thicker than a typical nail polish, so there was a slight learning curve with the application. However, once I got the hang of it, it really wasn't bad at all. I would also say that the brush was a bit too wide for my nail beds, but I just cleaned the polish off my cuticles before I cured it. In the end, I was extremely pleased with how my nails looked and I was beyond ecstatic that my nails were completely dry and I could get back to my day without worrying about smudging my manicure!

When comparing this product to the Shellac manicure I spoke of earlier, I would say they are equal in quality and strength, but this product seems so much easier to use because there are fewer steps. 

Click to enjoy this polish in all its glory!

Is that not the most glossy, gorgeous red polish you've ever seen?! I still can't believe that all I used was this tiny bottle of polish and an LED lamp. There was no base coat or top coat needed. The product claims to give you weeks of maintenance-free wear. I can definitely vouch for the strength of this polish and I can see how you could get a couple weeks worth of wear from it. I only wore this polish for about 6 days, and at that time it was still holding up quite well.

The directions for removing this polish are to soak your nails in the company's Liquid-Q for 5-10 minutes and rub the color off with an orange stick or finger pads. The company is located in Japan and they could not ship that product due to strict airmail regulations, so they claimed that pure acetone would work just as well. I was a bad, bad girl and peeled the polish off one evening while watching television. :O I know, I felt guilty the whole time, but I just couldn't help it. Soaking my fingers in acetone at the time didn't seem appealing. I was very lucky that my nails were not damaged in the process. ;)

Without top coat

So what you see above and below are two very similar photos. The top one is simply two coats of the 1Q32 Instant Gellish color, while the photo below has the 1Q32.TopQ (top coat). I personally cannot tell a difference. The instructions claim that the top coat is optional, but that it can help protect your manicure and keep it shiny for a longer period of time.

With the provided 1Q32.TopQ top coat

If you are the type of person that likes to have nicely manicured nails, but you hate that your nail polish only lasts a day or two before chipping, I would highly recommend this product. Each bottle this size is approximately $24, and that may seem a little high for its size, HOWEVER you would pay at least that much for a manicure in a salon. You can get multiple manicures out of one of these bottles!

If you are like me and you love to change your nail polish 2-3 times a week, then this product may not be for you because it is definitely meant to be a long-wearing polish. :)

If you'd like to see the HUGE selection of colors available, visit www.1Q32.com. Also, go like their Facebook Page so you can receive updates about specials they are running!

Thanks SO much for stopping by. I hope you have a great week!

--Dixie

**1Q32 Instant Gellish provided for review. Please read my disclosure policy for more information.**


Tuesday, October 23, 2012

Essie - Miss Fancy Pants

Yo.

I have been feeling a bit lazy with my nails lately, so today's manicure is plain jane. Sometimes it's nice to have one solid, neutral color that's not overwhelming. I really enjoyed this one. 

Clicky Clicky
This is Essie Miss Fancy Pants. It is a lovely brownish taupe with a hint of something kinda purple or pink? Basically when you can't decide if it is brown or gray, you call it taupe. The photos have your typical base coat, two coats of color, and top coat. Lately I've been using Revlon's Quick Dry Top Coat. 

The formula on this color is just lovely. My only complaint it that Essie's nail polishes have a super tiny brush. Sometimes it can be difficult to work with, but as you can see in the photos, this one cooperated quite well. I think I got about 4 days out of this one before it chipped. Not too shabby since that is usually as long as I can handle going before changing my polish again. 


I don't have much else to say. This is an eye-catching neutral polish and I got as many compliments on it as I do my brighter manicures. If you can deal with the small Essie brush, I'd highly recommend it. :)

Thanks for taking a peek at my nails!

--Dixie

Monday, October 22, 2012

SKINNY Bracelet

Helloooooo!

Today I have something to show you guys that is a little different from my usual shenanigans. I purchased a pretty bracelet from a company called SKINNY by Jessica Elliot. The website is www.skinnystyle.com. 

I discovered this brand through the Today Show on NBC. I was lucky enough to be watching a segment that they do occasionally that gives their viewers really great deals on popular products. The segment reminds me of the sort of deals you can get on Groupon. Please keep reading to learn more!


The bracelet you see in the photos above is their 18K gold plated equestrian bracelet with ivory Italian leather. There were a couple of other color combinations, but by the time I got to the website, most of the others were sold out. 

The original price of these bracelets are $120, but I managed to get mine for $29! I'd say that is a pretty good deal. :) If you would like to check out the other color options available, you can click HERE to be directed to these exact bracelets. They are all very pretty and it is difficult to choose just one!

Thanks for reading!

--Dixie