Showing posts with label Nail Polish. Show all posts

Wednesday, October 31, 2012

1Q32 Instant Gellish

Happy Wednesday, Dixie's Cuppers!

The following post is about nail polish, but it differs from the variety of nail polish I typically blab about. Today I will be showing you a UV/LED light-cure gel polish from 1Q32 Instant Gellish. I was immediately interested in this product because it claims to be tough and long-lasting like your typical light-cured gel manicures, but with only ONE STEP. In the past I have visited nail salons and received Shellac manicures that are well known for lasting at least 2 weeks. I really enjoyed those manicures because they were low-maintenance; however they required multiple steps like base coats, primers, pH bonders and cleansers to remove the sticky layer after curing. 

Keep reading to learn more about this product and to see photos!


The process of prepping your nails for this polish is the same way I typically would prep for a normal nail polish. After that, the application of the 1Q32 Instant Gellish is very easy. Below I have listed the step-by-step instructions:

1. Push back your cuticles with a cuticle pusher. 
2. Cleanse the nail surface with a nail polish remover to remove dirt and oil. 
3. Apply a layer of 1Q32 Instant Gellish color onto your nail, and avoid staining the skin.
4. Place under a UV or LED lamp to harden and dry your 1Q32 Instant Gellish color. (My bottles said that with a UV lamp the cure time is 2-3 minutes and with an LED lamp it is 20-30 seconds.)
5. Apply 2nd layer of color and repeat step 4 to harden and dry.
6. Your nails are polished, shiny, and dry to the touch instantly. 


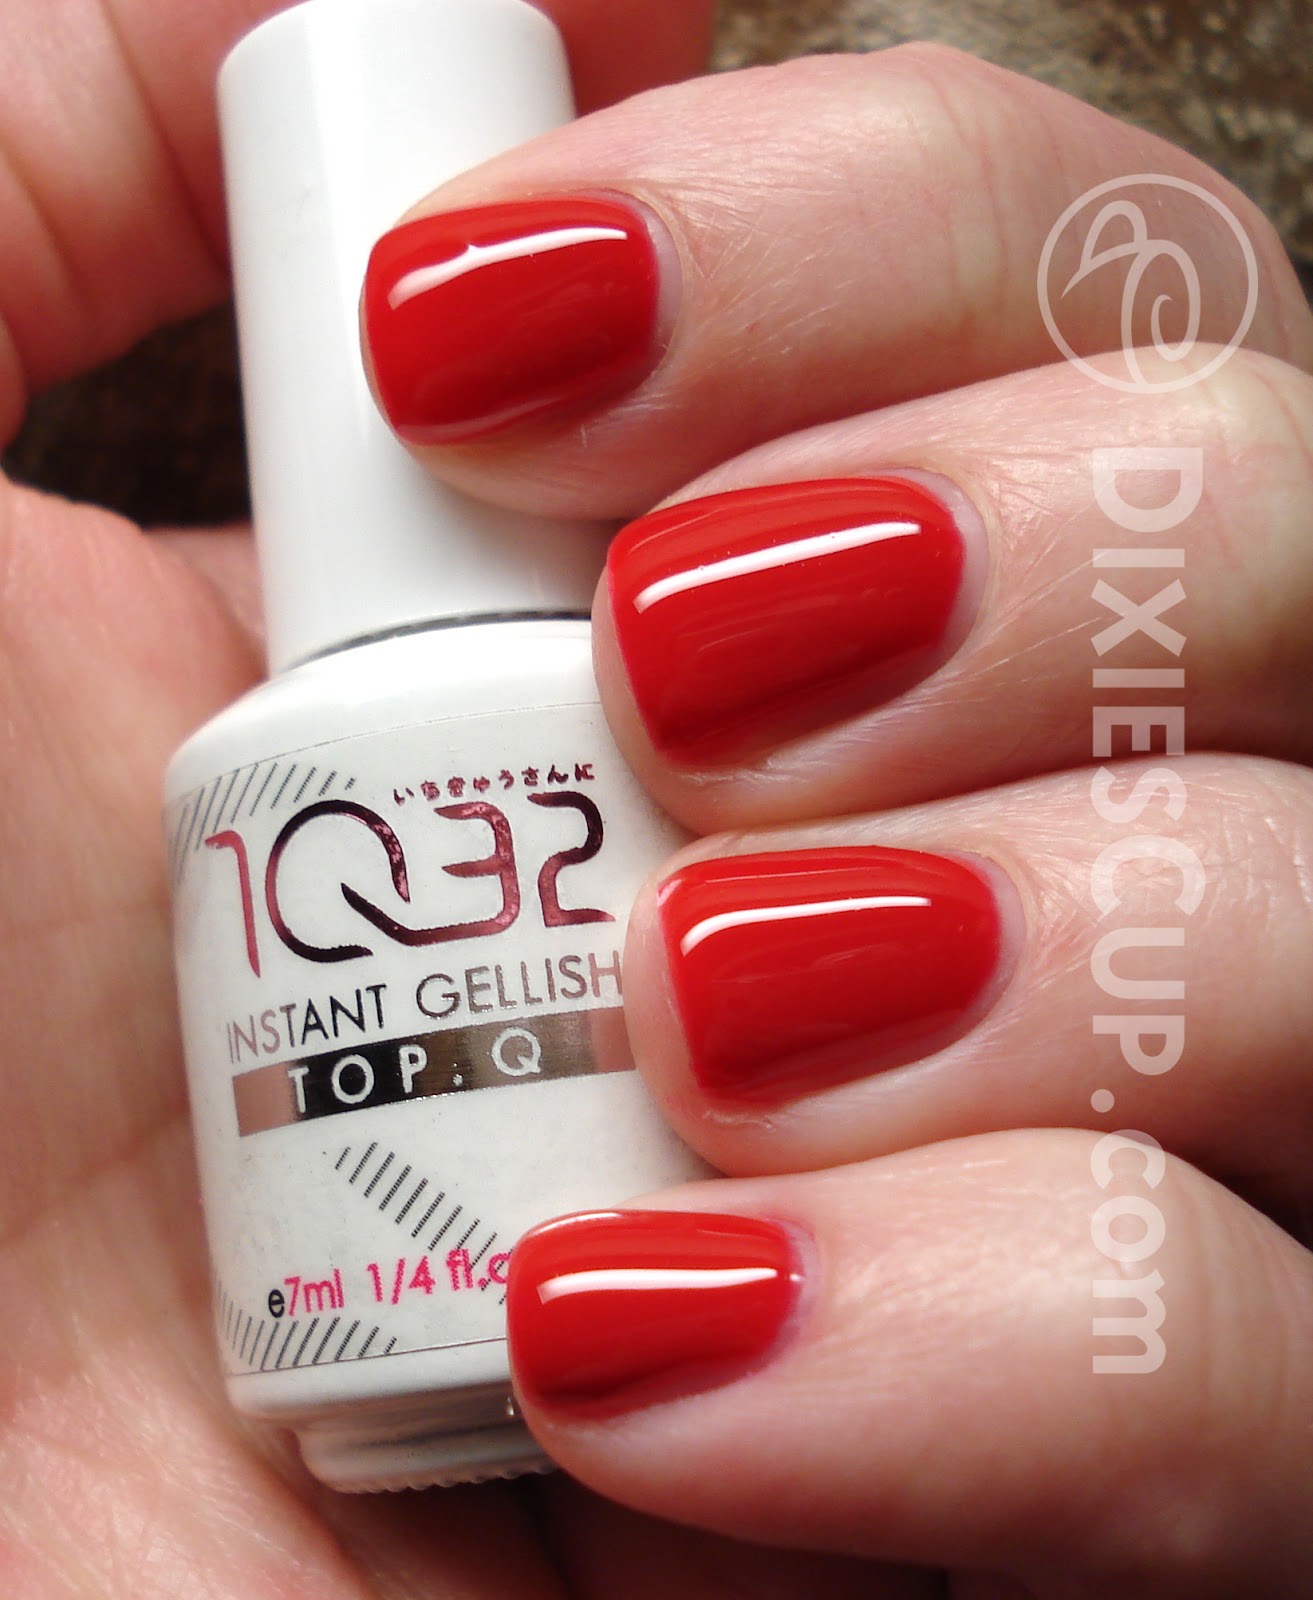
All of the photos except for the very last one show two coats of 1Q32's QB45 which is a lovely, bright cherry red! I used an LED lamp that I purchased at Walmart, so my nails cured perfectly in 30 seconds. The formula of this polish was a bit thicker than a typical nail polish, so there was a slight learning curve with the application. However, once I got the hang of it, it really wasn't bad at all. I would also say that the brush was a bit too wide for my nail beds, but I just cleaned the polish off my cuticles before I cured it. In the end, I was extremely pleased with how my nails looked and I was beyond ecstatic that my nails were completely dry and I could get back to my day without worrying about smudging my manicure!

When comparing this product to the Shellac manicure I spoke of earlier, I would say they are equal in quality and strength, but this product seems so much easier to use because there are fewer steps. 

Click to enjoy this polish in all its glory!

Is that not the most glossy, gorgeous red polish you've ever seen?! I still can't believe that all I used was this tiny bottle of polish and an LED lamp. There was no base coat or top coat needed. The product claims to give you weeks of maintenance-free wear. I can definitely vouch for the strength of this polish and I can see how you could get a couple weeks worth of wear from it. I only wore this polish for about 6 days, and at that time it was still holding up quite well.

The directions for removing this polish are to soak your nails in the company's Liquid-Q for 5-10 minutes and rub the color off with an orange stick or finger pads. The company is located in Japan and they could not ship that product due to strict airmail regulations, so they claimed that pure acetone would work just as well. I was a bad, bad girl and peeled the polish off one evening while watching television. :O I know, I felt guilty the whole time, but I just couldn't help it. Soaking my fingers in acetone at the time didn't seem appealing. I was very lucky that my nails were not damaged in the process. ;)

Without top coat

So what you see above and below are two very similar photos. The top one is simply two coats of the 1Q32 Instant Gellish color, while the photo below has the 1Q32.TopQ (top coat). I personally cannot tell a difference. The instructions claim that the top coat is optional, but that it can help protect your manicure and keep it shiny for a longer period of time.
With the provided 1Q32.TopQ top coat

If you are the type of person that likes to have nicely manicured nails, but you hate that your nail polish only lasts a day or two before chipping, I would highly recommend this product. Each bottle this size is approximately $24, and that may seem a little high for its size, HOWEVER you would pay at least that much for a manicure in a salon. You can get multiple manicures out of one of these bottles!

If you are like me and you love to change your nail polish 2-3 times a week, then this product may not be for you because it is definitely meant to be a long-wearing polish. :)

If you'd like to see the HUGE selection of colors available, visit www.1Q32.com. Also, go like their Facebook Page so you can receive updates about specials they are running!

Thanks SO much for stopping by. I hope you have a great week!

--Dixie

**1Q32 Instant Gellish provided for review. Please read my disclosure policy for more information.**


Monday, July 23, 2012

Winner Winner Chicken Dinner

HAPPY MONDAY! 

I have some good news for one lucky person today! My nail polish giveaway ended last night while I was asleep, and I'm just now getting the opportunity to announce the winner. 

Essie Poppy-Razi Collection


Congratulations, Mass Deaf (A.K.A. Timothy)! That's right ladies... the ONLY male that entered my giveaway managed to win. The odds were apparently in his favor. He plans to make sure the polishes get used to their full potential by kindly gifting them to his girlfriend. 

Proof that I didn't make it up!

Rafflecopter selected the winner randomly, so I hope there are no hard feelings!

Also, I thought I'd throw in the fun little fact that the terms and conditions at the bottom of the giveaway stated "By entering this giveaway, you are agreeing to be my personal slave until the rest of forever. I can also keep the nail polish in this giveaway and mail you paper towels instead." I don't suppose I'll hold you all to this, but I sure didn't want to let it go unknown. ;)

Hope you have a great evening! I'll be working on other posts after this so you'll have something more interesting to read soon. 

--Dixie

Monday, July 2, 2012

The Most Interesting Polish Addict in the World

Sup?

I know how we all love the hilarious memes that are floating around the internet lately, so when I saw this on a nail polish blog I follow & love (Ice Queen's Nail Parlour) I HAD to share it. 


Glad we all had a good laugh. Have a happy Monday! *groans* :-/

--Dixie

Saturday, March 3, 2012

Revlon - Royal

Happy Saturday!

I finally got around to painting my nails again and I was really excited because I got to use a polish I discovered on a couple of different blogs that I already knew was going to be gorgeous!

This is Revlon Royal.


Revlon Royal without the flash.


With flash.


Macro shot. Sorry it is a little blurry. 

How pretty is this?! I love it and I'll probably use it a lot. After this color and the last color I posted (Revlon Velvet Rope), I've decided I'm a huge fan of jelly polishes. They are so pretty to look at, and I am constantly asked if I went to a salon to get a manicure! 

A fair warning: this polish dries to a vinyl/matte finish. You must use a top coat to get the glossy shine that I got on this one, and I use the Seche Vite fast dry top coat.

I don't think I can say how much I love this. I just couldn't stop staring at my nails all day. :)

Thanks for stopping by!

-Dixie


Thursday, February 9, 2012

Revlon - Velvet Rope


Hello dears.

Today I have for you a gorgeous red jelly polish. This is Velvet Rope from Revlon's newest collection. (Photos are clickable to enlarge.)


How pretty is this? I know red is boring, but I've been on the hunt for MY perfect red, and I think I finally found it. I really had my eye on Chanel's Pirate, but I have a really hard time spending $26 on a polish! I can't do a swatch comparison, but I'd say this is pretty dern close. And this only cost me 5 or 6 bucks. :)


My macro shot for you. This is with a base coat, 2 coats of Velvet Rope, and a top coat of Seche Vite. It applies neatly, doesn't flood the cuticle area, self-corrects. I have no complaints. 


And this is a picture with the flash on. You can tell it looks much lighter in this shot. The true color is closer to the photo above without the flash. It is a very deep, blood red. Perdy. :-P

Thanks for stopping by! I hope you enjoyed yourself.

Dixie

Sunday, January 29, 2012

Fingernails with Facial Hair

Okay. I'm slightly embarrassed to share this fiasco of a paint job with you, but I've decided to share all of my adventures including the good, the bad, and the ugly.

Today I have an attempt at a fun french manicure with some moustache decals. I ordered these decals from My Crazy Worlds' Etsy shop. 40 decals for $3.50, and shipping is free! (And you can pick colors other than black)


As I mentioned, I'm not terribly happy with the results. I was in a hurry to do this, so I didn't use any sort of base coat. I should have used something like a light pink. Instead I just used my Sally Hansen French Manicure Pen on top of my bare nails. Then I placed the decals on my thumb & index finger with tweezers. Then I applied a clear, fast-dry topcoat. From far away, it was cute. But up close my cuticles are gross and dry, and the top coat started peeling the next day (probably because it had nothing to stick to).


This pen is handy for quick french manicures, but it is difficult to make straight lines even with your dominant hand. It looks much nicer if you use tape to make clean lines, in my opinion. 


My decals and the business card that came with it. 

I still have lots of decals left, so I plan to play around with these some more. I promise to do a better job next time! :)

Thanks for stopping by!

-Dixie


Sunday, January 22, 2012

Zoya - Phoebe

Sup Dudes?

I have a post today about a new nail polish that I acquired from ULTA (on sale!). It is Zoya's Phoebe. I first discovered this pretty little thing via one of my favorite nail blogs (Visit it at LetThemHavePolish.com). Please don't compare my blog with hers, she is REALLY good at nail polish. :)

Phoebe is different and awesome because it dries to a matte finish. Here are a couple of pictures of Phoebe on my nails (all photos are clickable to make them bigger).


I'm not all that great at photographing nail polish, so it took a lot of shots to get these two pictures. I'll work on improving that. Anyway, the first photo is just in regular lighting and the second is a close-up with the flash on. You can see the shimmer in the polish, and you can also see the matte finish.

This look is 3 coats of Zoya Phoebe on top of a clear base coat. I was really happy with how this looked!  So pretty.

The first two coats were all streaky and disappointing, but I decided to keep going because I had seen this polish on the aforementioned blog and knew it was capable of being pretty. Surprisingly, the third coat finished things off nicely. And if you aren't familiar with matte nail polishes, they are great because they dry super fast. No top coat required... because it will make the matte polish non-matte. :)

The major downside to the couple of matte polishes that I've tried: they seem to chip easily. This manicure only lasted me about half a day, if that, before chipping so much that I felt like I needed to take it off. 

Aside from the chipping, I really liked this nail polish. I managed to get its lime green buddy (Zoya - Mitzi) the same day. When I try it out, I'll let you know.

Thanks for reading! 
-Dixie